You love Notion. Databases, automations, everything in one place - it’s tempting to run your entire business there. Including customer support.
⚡ TL;DR - Want the template? Get a ready-made Notion ticketing system: database structure, views, automations, and charts already configured. Grab the free template and follow along with this guide.
But there’s a problem: your customers don’t use Notion. They use email.
SlapMail bridges that gap. It connects your support inbox to Notion, so emails become tickets and replies go out directly from your database. Your customers keep using email. You stay in Notion.
This guide shows you how to build a complete ticketing system in Notion: receive tickets from email or forms, reply directly from Notion, automate workflows like auto-close, measure your support performance and use Notion AI to summarize threads and draft replies faster.
What you’ll need:
- A Notion workspace (Plus plan or higher recommended for automations and charts)
- A SlapMail account (start free trial )
- A support email address (Gmail or Outlook)
Why Notion for ticketing?
If you already use Notion, adding a separate helpdesk tool means another interface to learn and constant switching between apps. Why not keep everything in one place?
-
Stay in one interface. SlapMail is a lightweight integration, not a full platform. There’s no separate dashboard to manage, no new UI to learn - your team works entirely in Notion. And compared to dedicated helpdesk tools like Zendesk or Intercom, the total cost is typically much lower.
-
No context switching. Your team stays in Notion. Tasks, docs, projects, and now tickets/emails - all accessible without jumping between tabs.
-
Build exactly what you need. Unlike rigid helpdesk tools, Notion lets you create the properties, views, and workflows that match your process - not the other way around.
-
Use Notion AI. If you’re on a Business plan, you can summarize long threads, draft replies using your documentation, or analyze tickets to spot trends - right from the ticket page.
But there’s a bigger reason: tickets are valuable information, and they shouldn’t be siloed.
-
Link tickets to your product backlog. When a customer reports a bug or requests a feature, link the ticket to the relevant task. When you ship, you know exactly who to notify. You can also see which features get requested most.
-
Spot documentation gaps. If you keep answering the same question, that’s a sign your docs are missing something. Turn a reply into a new doc page in seconds.
-
Find your best customers. Tickets reveal who’s engaged, who’s happy, and who might be a great candidate for a testimonial.
In tools like Zendesk or Intercom, this information stays locked in the support silo. In Notion, it flows to product, marketing, and sales.
What you’ll build
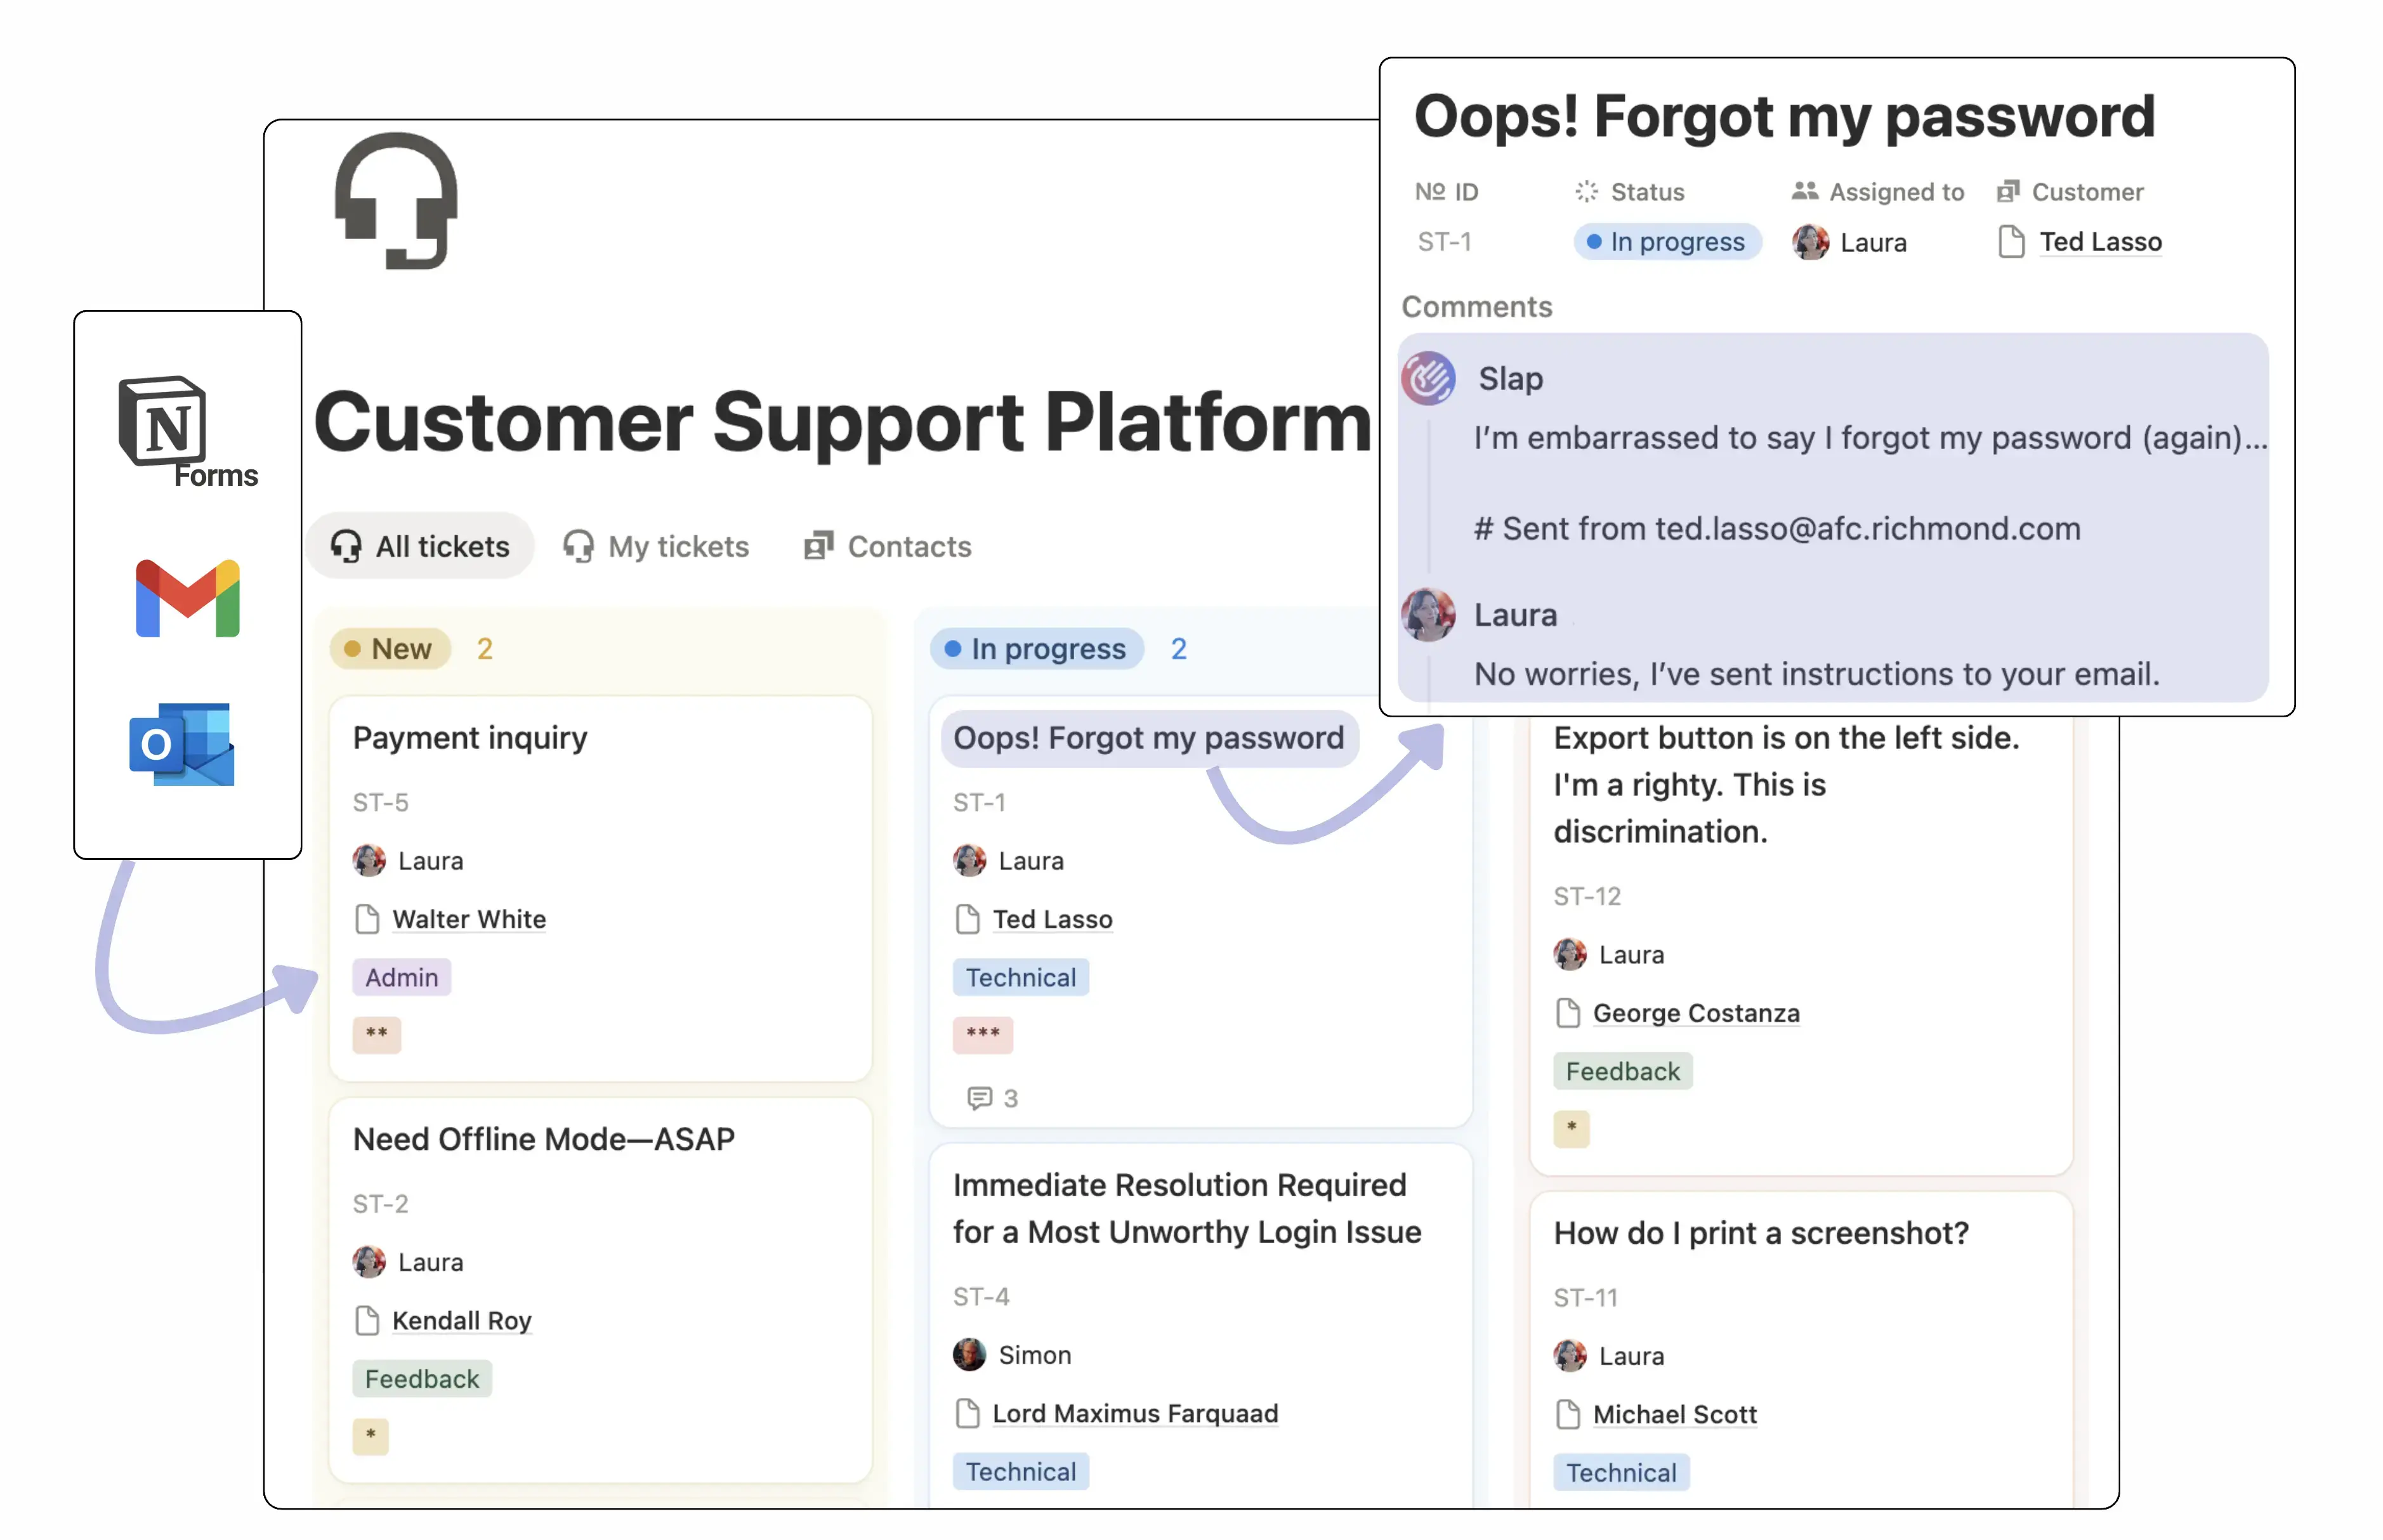
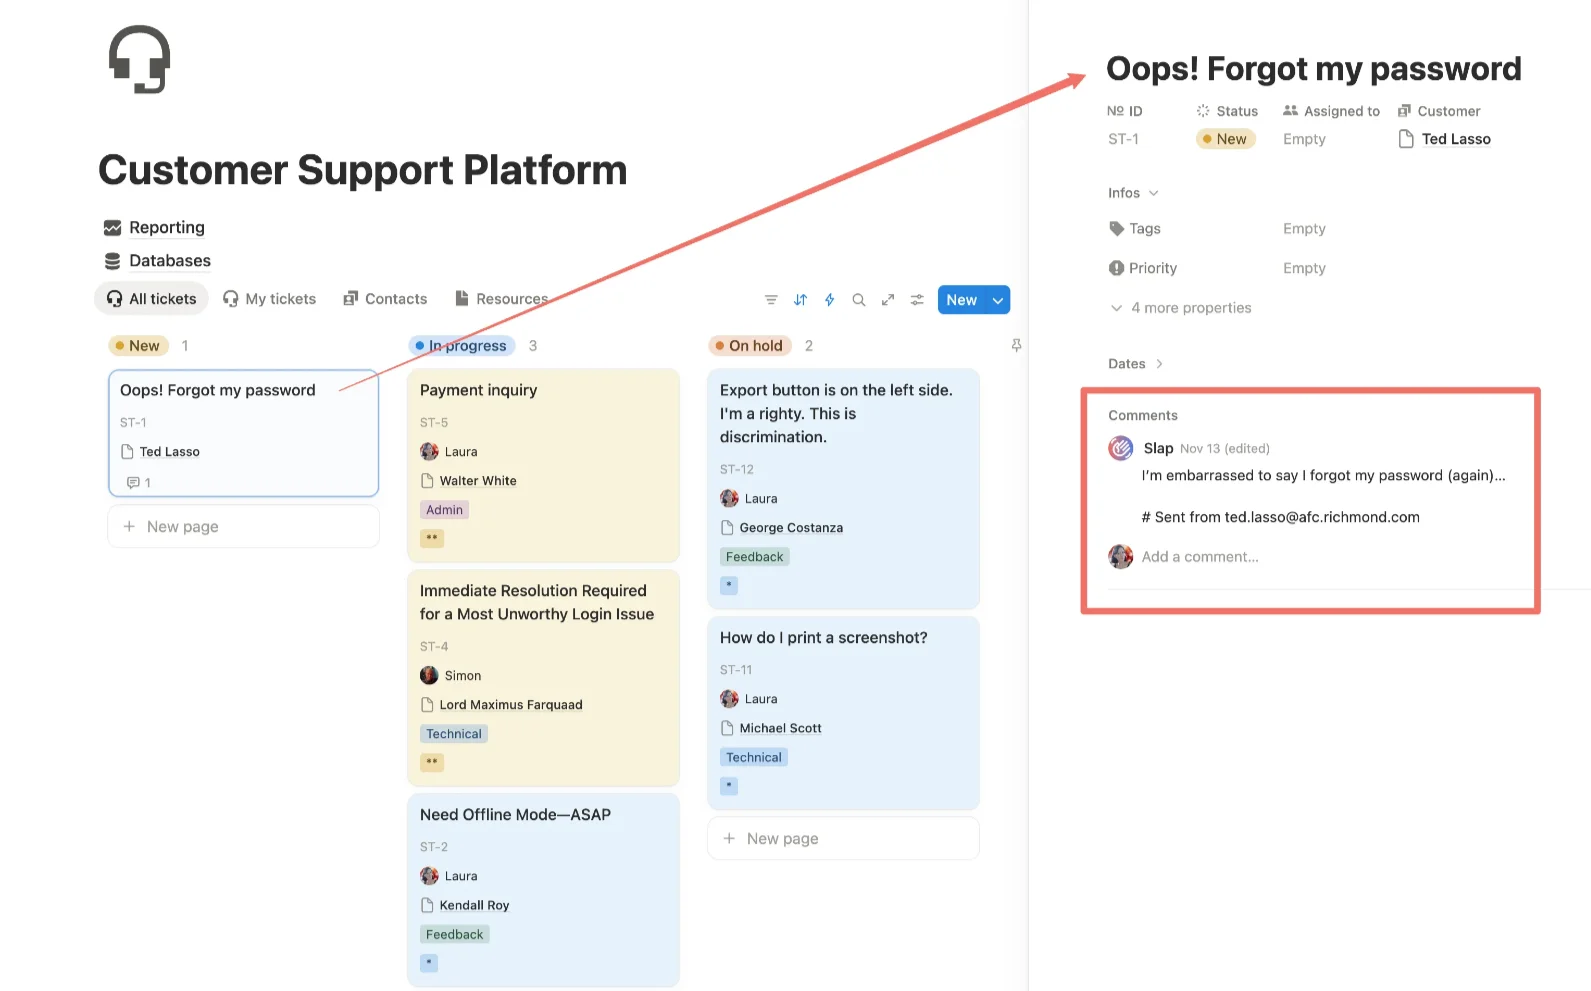
By the end of this guide, you’ll have a complete ticketing system in Notion: a Kanban board where every card is a ticket, emails live in comments, and you reply without leaving Notion.
Emails arrive in your support inbox → SlapMail creates a ticket in your database → you assign, tag, and reply from the ticket page → your customer receives a normal email back. The full conversation stays attached to the ticket.
You’ll also set up automations (auto-close inactive tickets, reopen when customers reply), track metrics (time to resolution, tickets by assignee), and optionally use Notion AI to speed up your replies.
Setting up your system
Databases
Tickets database
Create a new database or use our free template . Here are the essential properties:
Core properties:
- Subject (title) - The ticket subject.
- ID (auto-increment) - Add a prefix like HELP- or SUPPORT- for easy reference when working with colleagues.
- Status (status) - e.g., New, In progress, On hold, Done.
- Priority (select) - e.g., High, Medium, Low.
- Tags (multi-select) - Categorize by type (Technical, Admin, Feedback - customize to your needs).
- Assigned to (person) - Who’s handling this ticket.
SlapMail properties (create these, SlapMail fills them):
- Contact emails (text) - Email addresses of participants in the thread.
- Thread ID (text) - Links emails in the same conversation. You can hide this property.
We’ll add more properties for automations and metrics later in this guide.
Contacts database (optional)
If you often talk with the same customers, add a Contacts database. This lets you see all tickets from one person and builds customer history over time.
Properties:
- Name (title).
- Email Address (email).
- Related tickets (relation to Tickets database).
- Then add the properties that are useful for your use case (industry, phone number, …).
SlapMail will automatically link tickets to existing contacts based on email address. It won’t create new contacts - only link to existing ones.
Tip: If you already have a contacts or CRM database, you can use it.
Views
A clean interface is critical for adoption. Ask yourself: What needs to attract my attention? What do I want to see at a glance?
Recommended setup
Use a Kanban board grouped by Status. This lets you see where tickets are and drag them between columns. Sort by Priority so urgent tickets rise to the top.
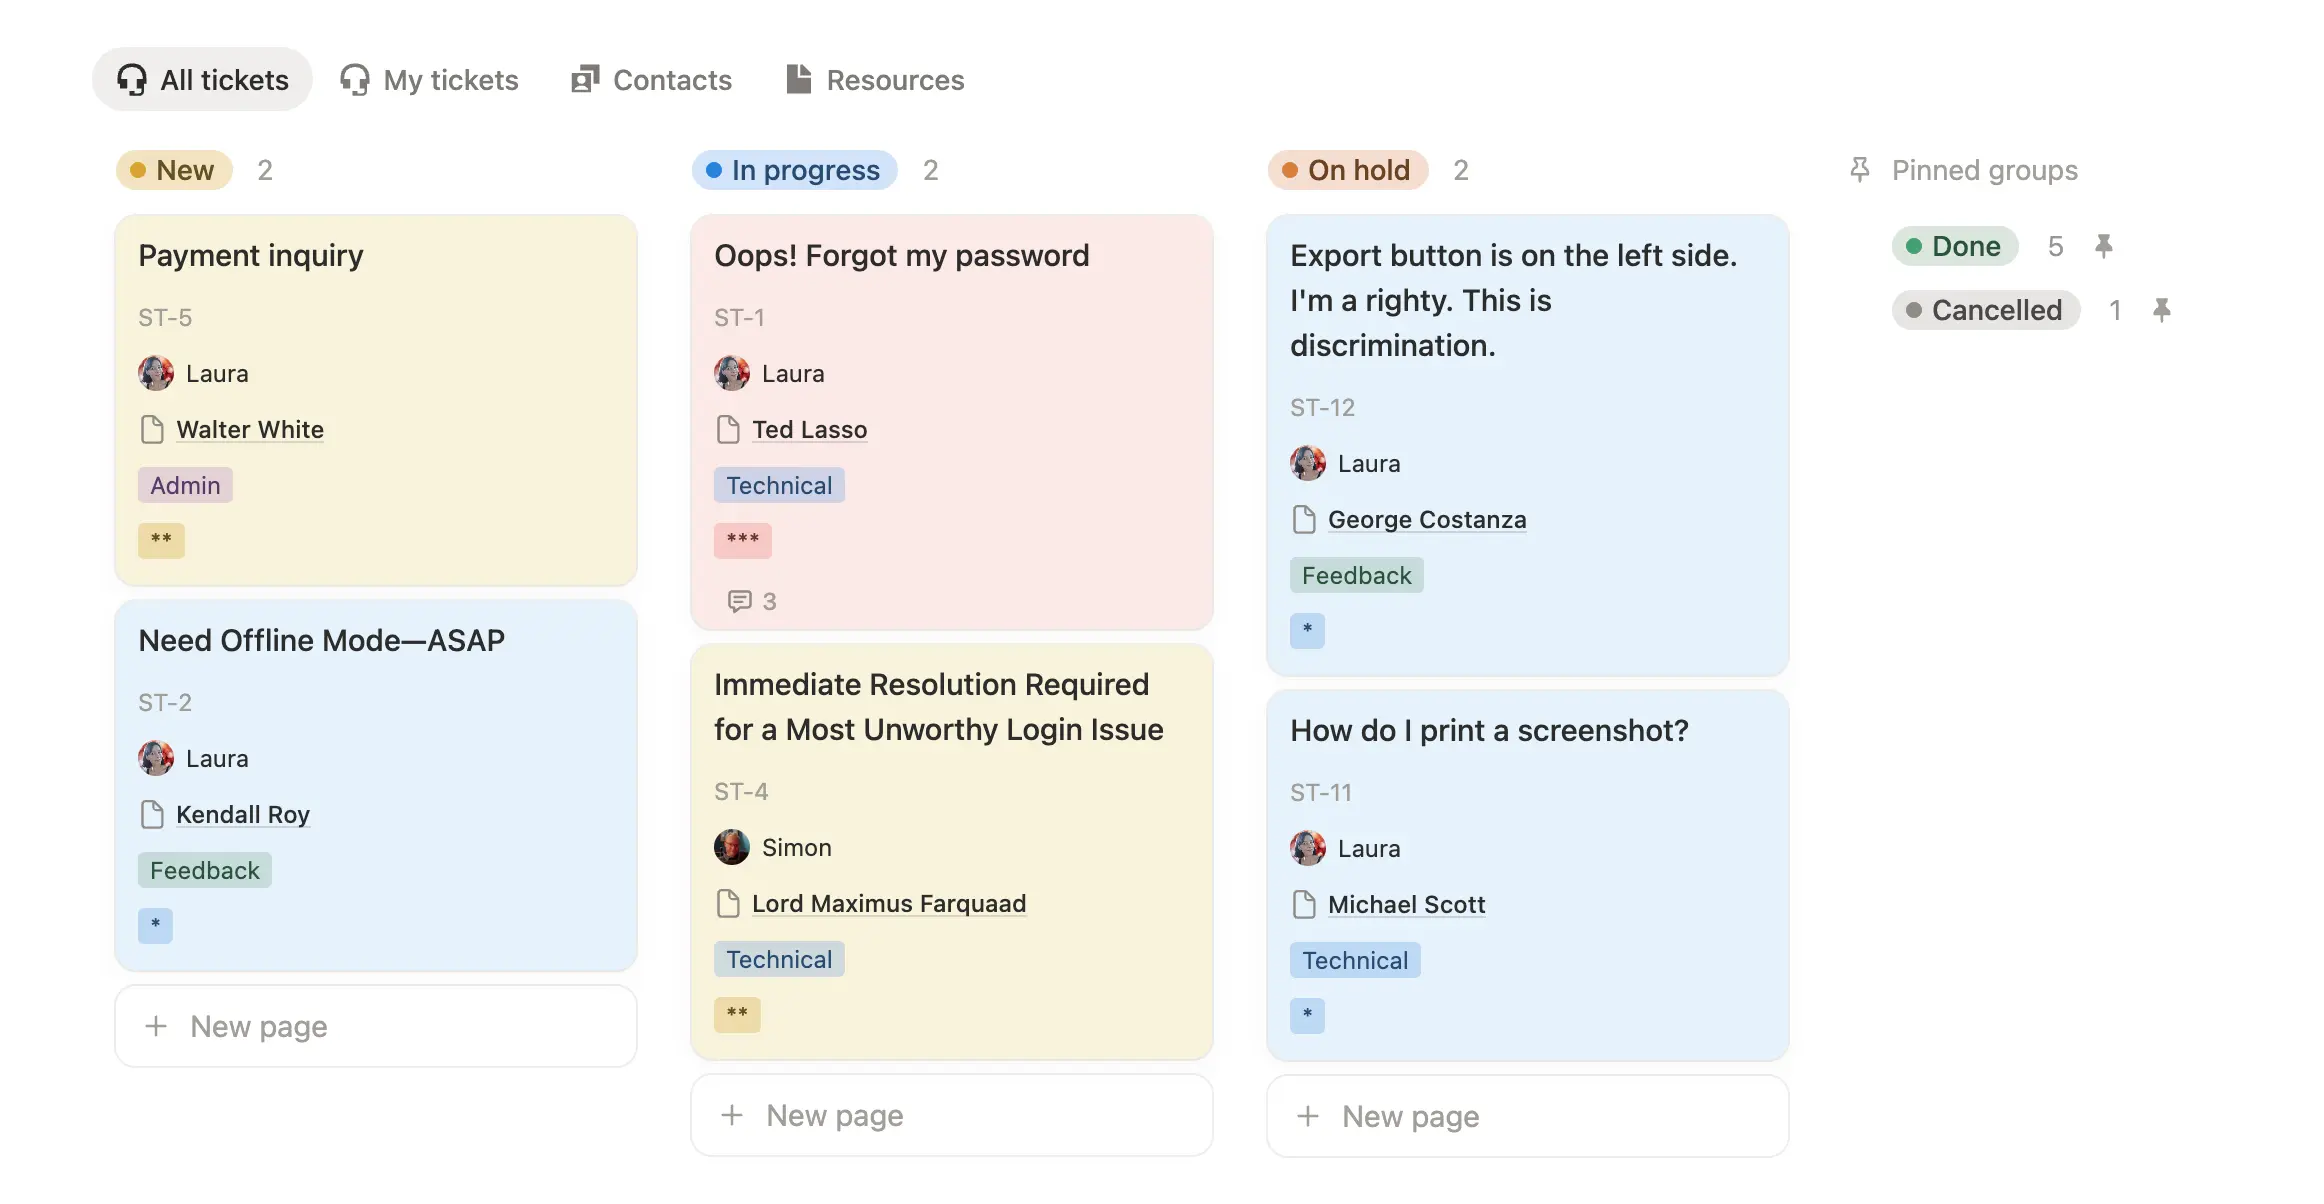
Use tabs to organize your workspace:
- All tickets - Your main board view.
- My tickets - Filtered to your assigned tickets only.
- Contacts - Quick access to customer info (if using Contacts database).
- Resources - Link to FAQs, SOPs, or documentation your team references often.
Card properties to display:
- Name, ID, Assigned to, Contact, Tags.
- Keep it minimal - too many properties clutters the board.
Use color formatting to highlight what matters:
- Color by priority (red for high, yellow for low).
- Or color based on how long a ticket has been open (we’ll cover this in Automations).
- Or highlight tickets missing required info (e.g., no contact linked).
Page layouts
A well-organized page layout makes working with tickets faster and less cluttered.
Ticket page layout
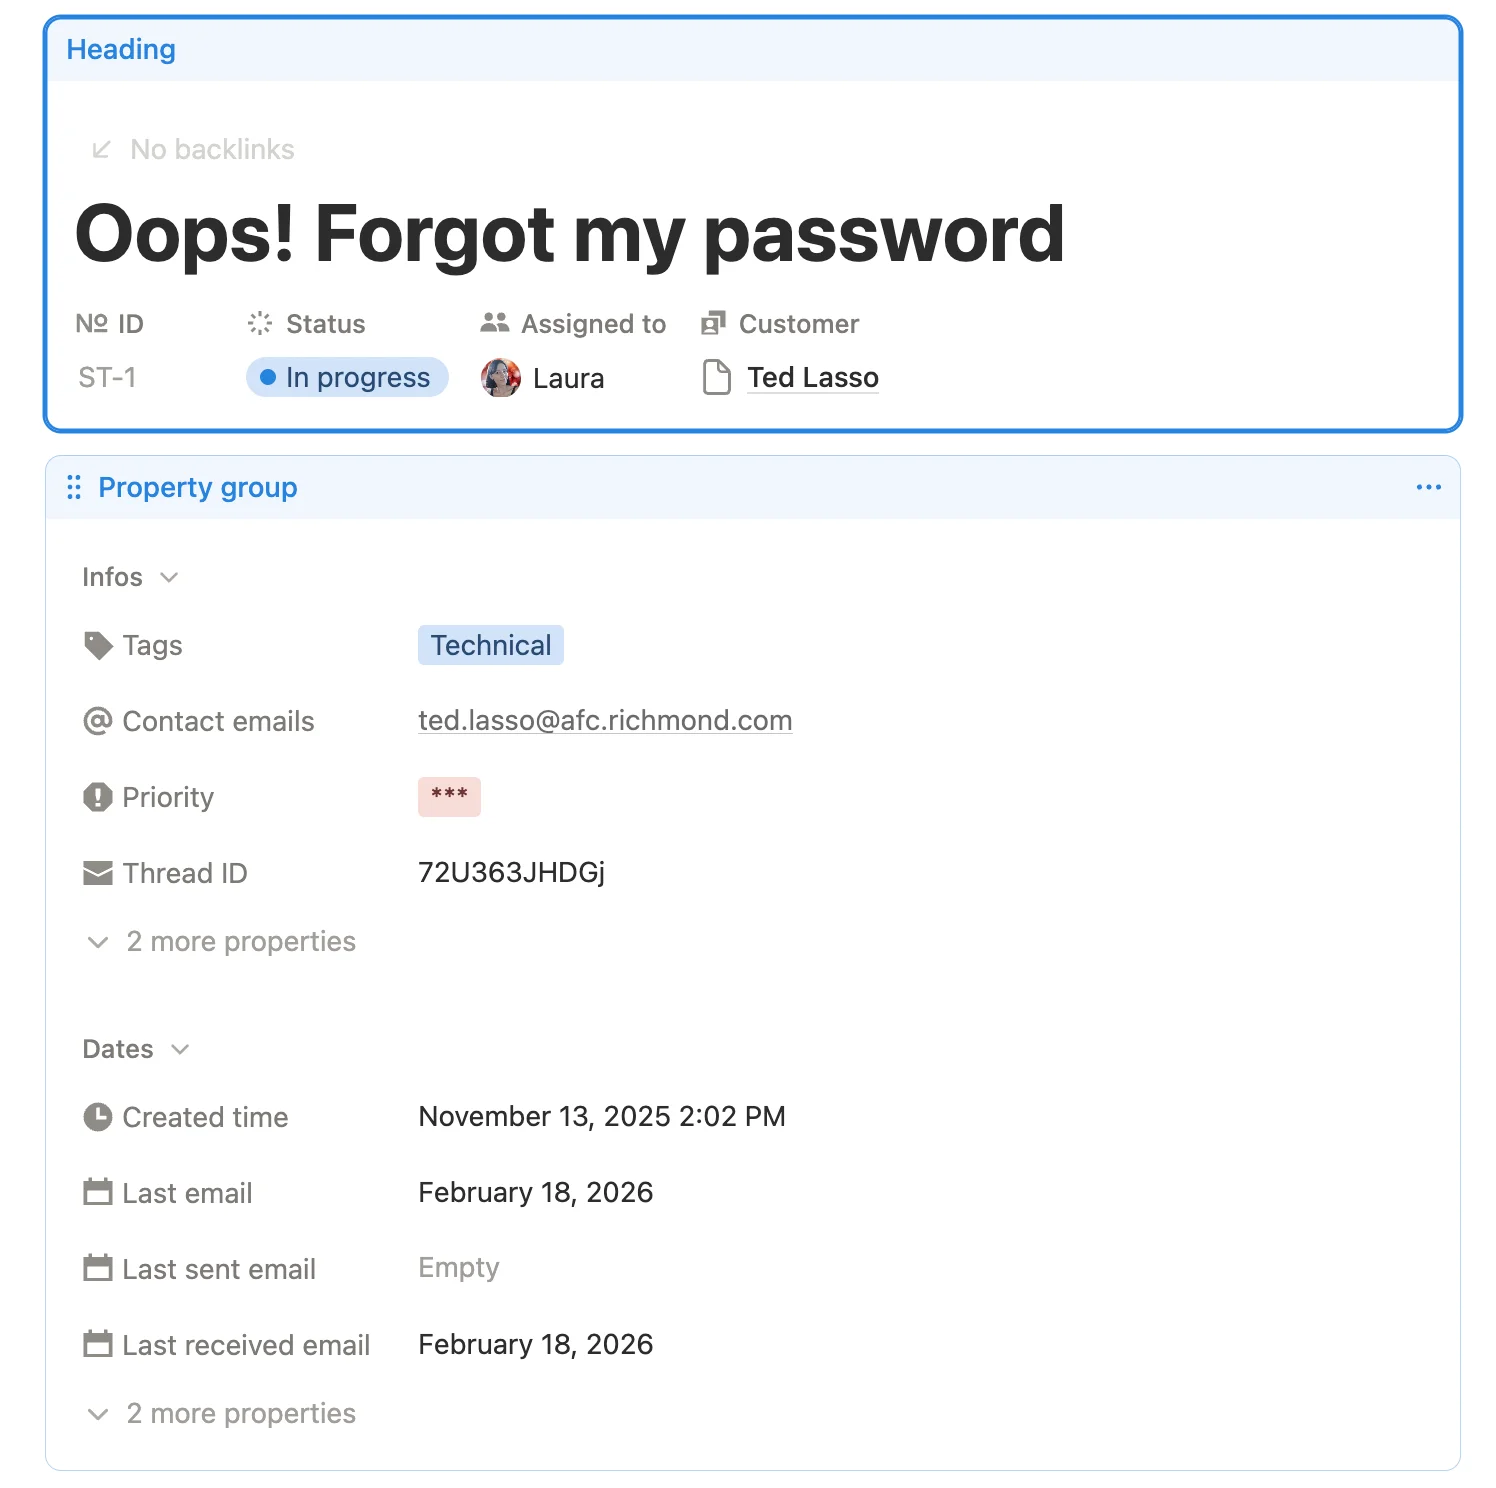
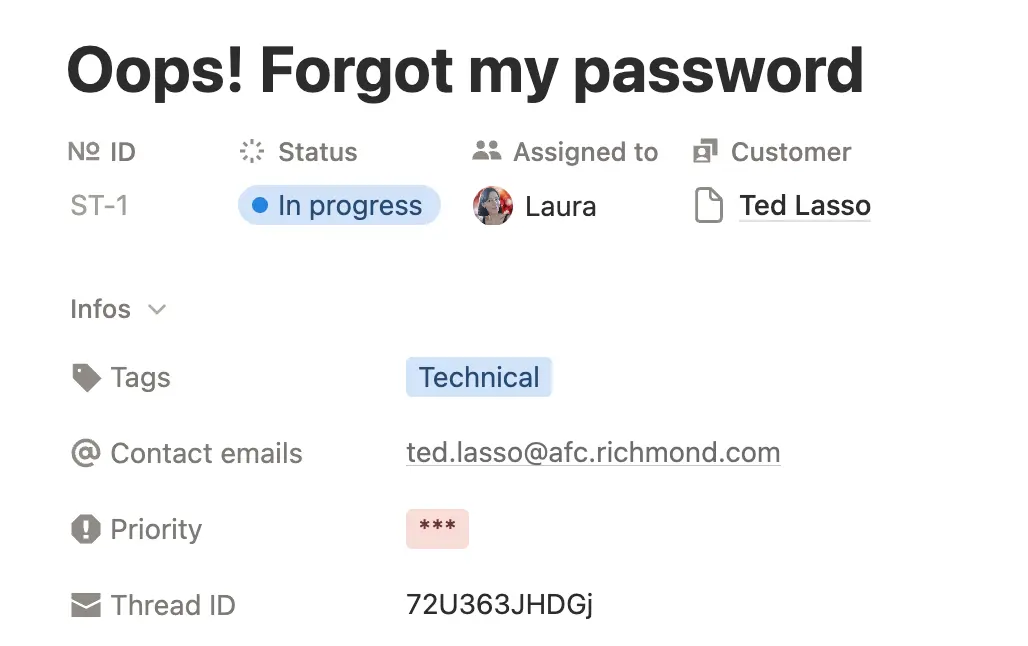
Pin important properties at the top:
- ID, Status, Contact, Assigned to.
These are what you need to see immediately when opening a ticket.
Group properties into sections:
- Info - Tags, Contact emails, Priority.
- Dates - Last email, Last sent email, Last received email, Closed on, Time open.
Sections keep related properties together. You can collapse sections you don’t need to declutter.
Hide technical properties:
- Thread ID and Source mailbox are technical fields - hide them from the page layout.
Hide when empty:
- Closed on and Time open only matter after a ticket is closed. Set these to “hide when empty” so they don’t show on open tickets.
Contact page layout (2-database mode)
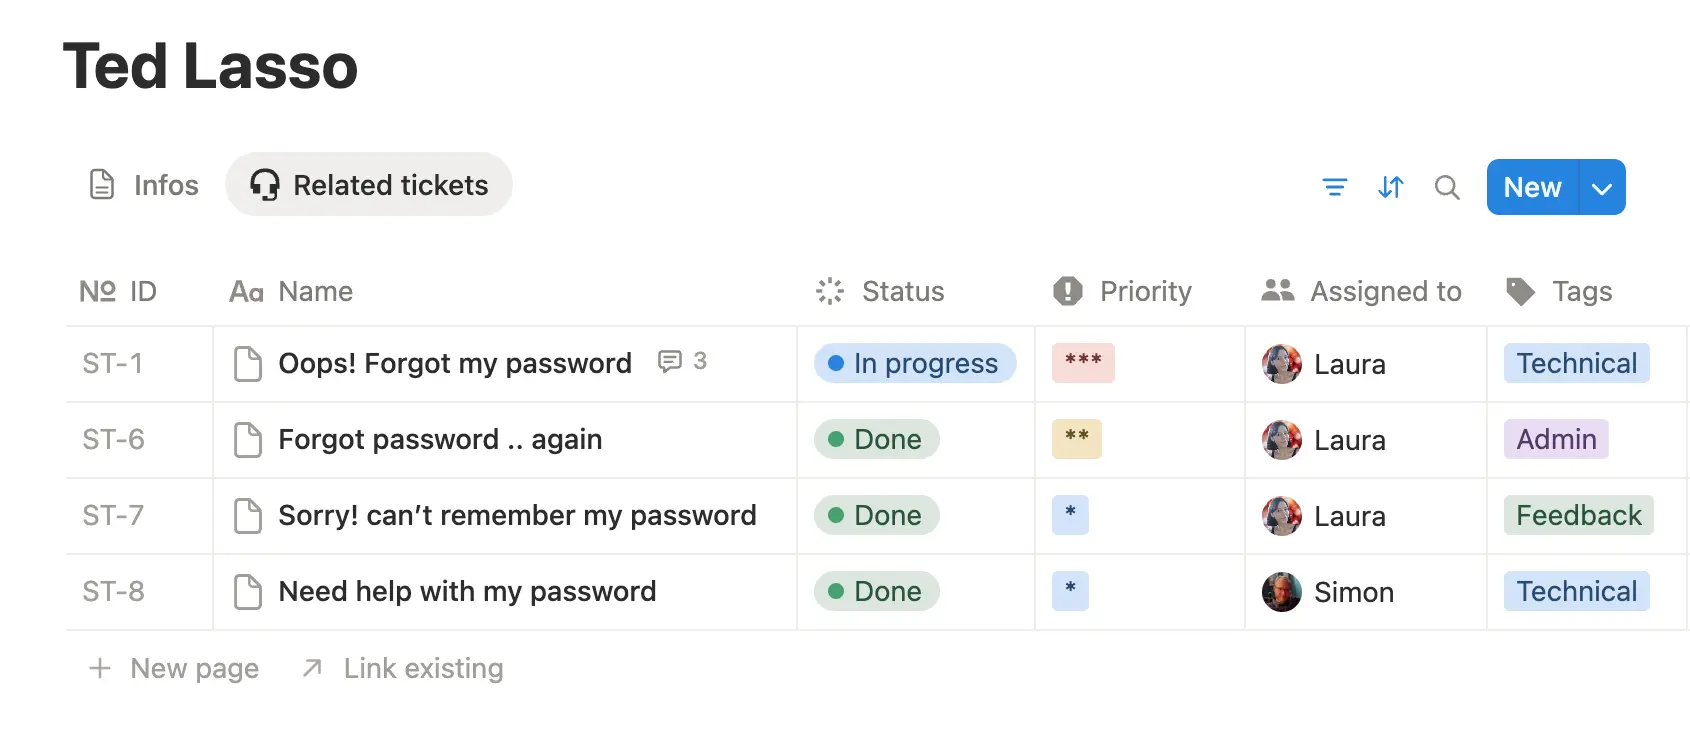
Use a tabbed layout to see all tickets from one customer at a glance:
- Open any contact page.
- Click ⋯ → Customize layout → Page settings → Structure.
- Select Tabbed.
- Add a tab with a linked view of the Tickets database, filtered to show only tickets related to this contact.
This gives you instant access to a customer’s full history without leaving the contact page.
SlapMail setup
Basic setup (single database)
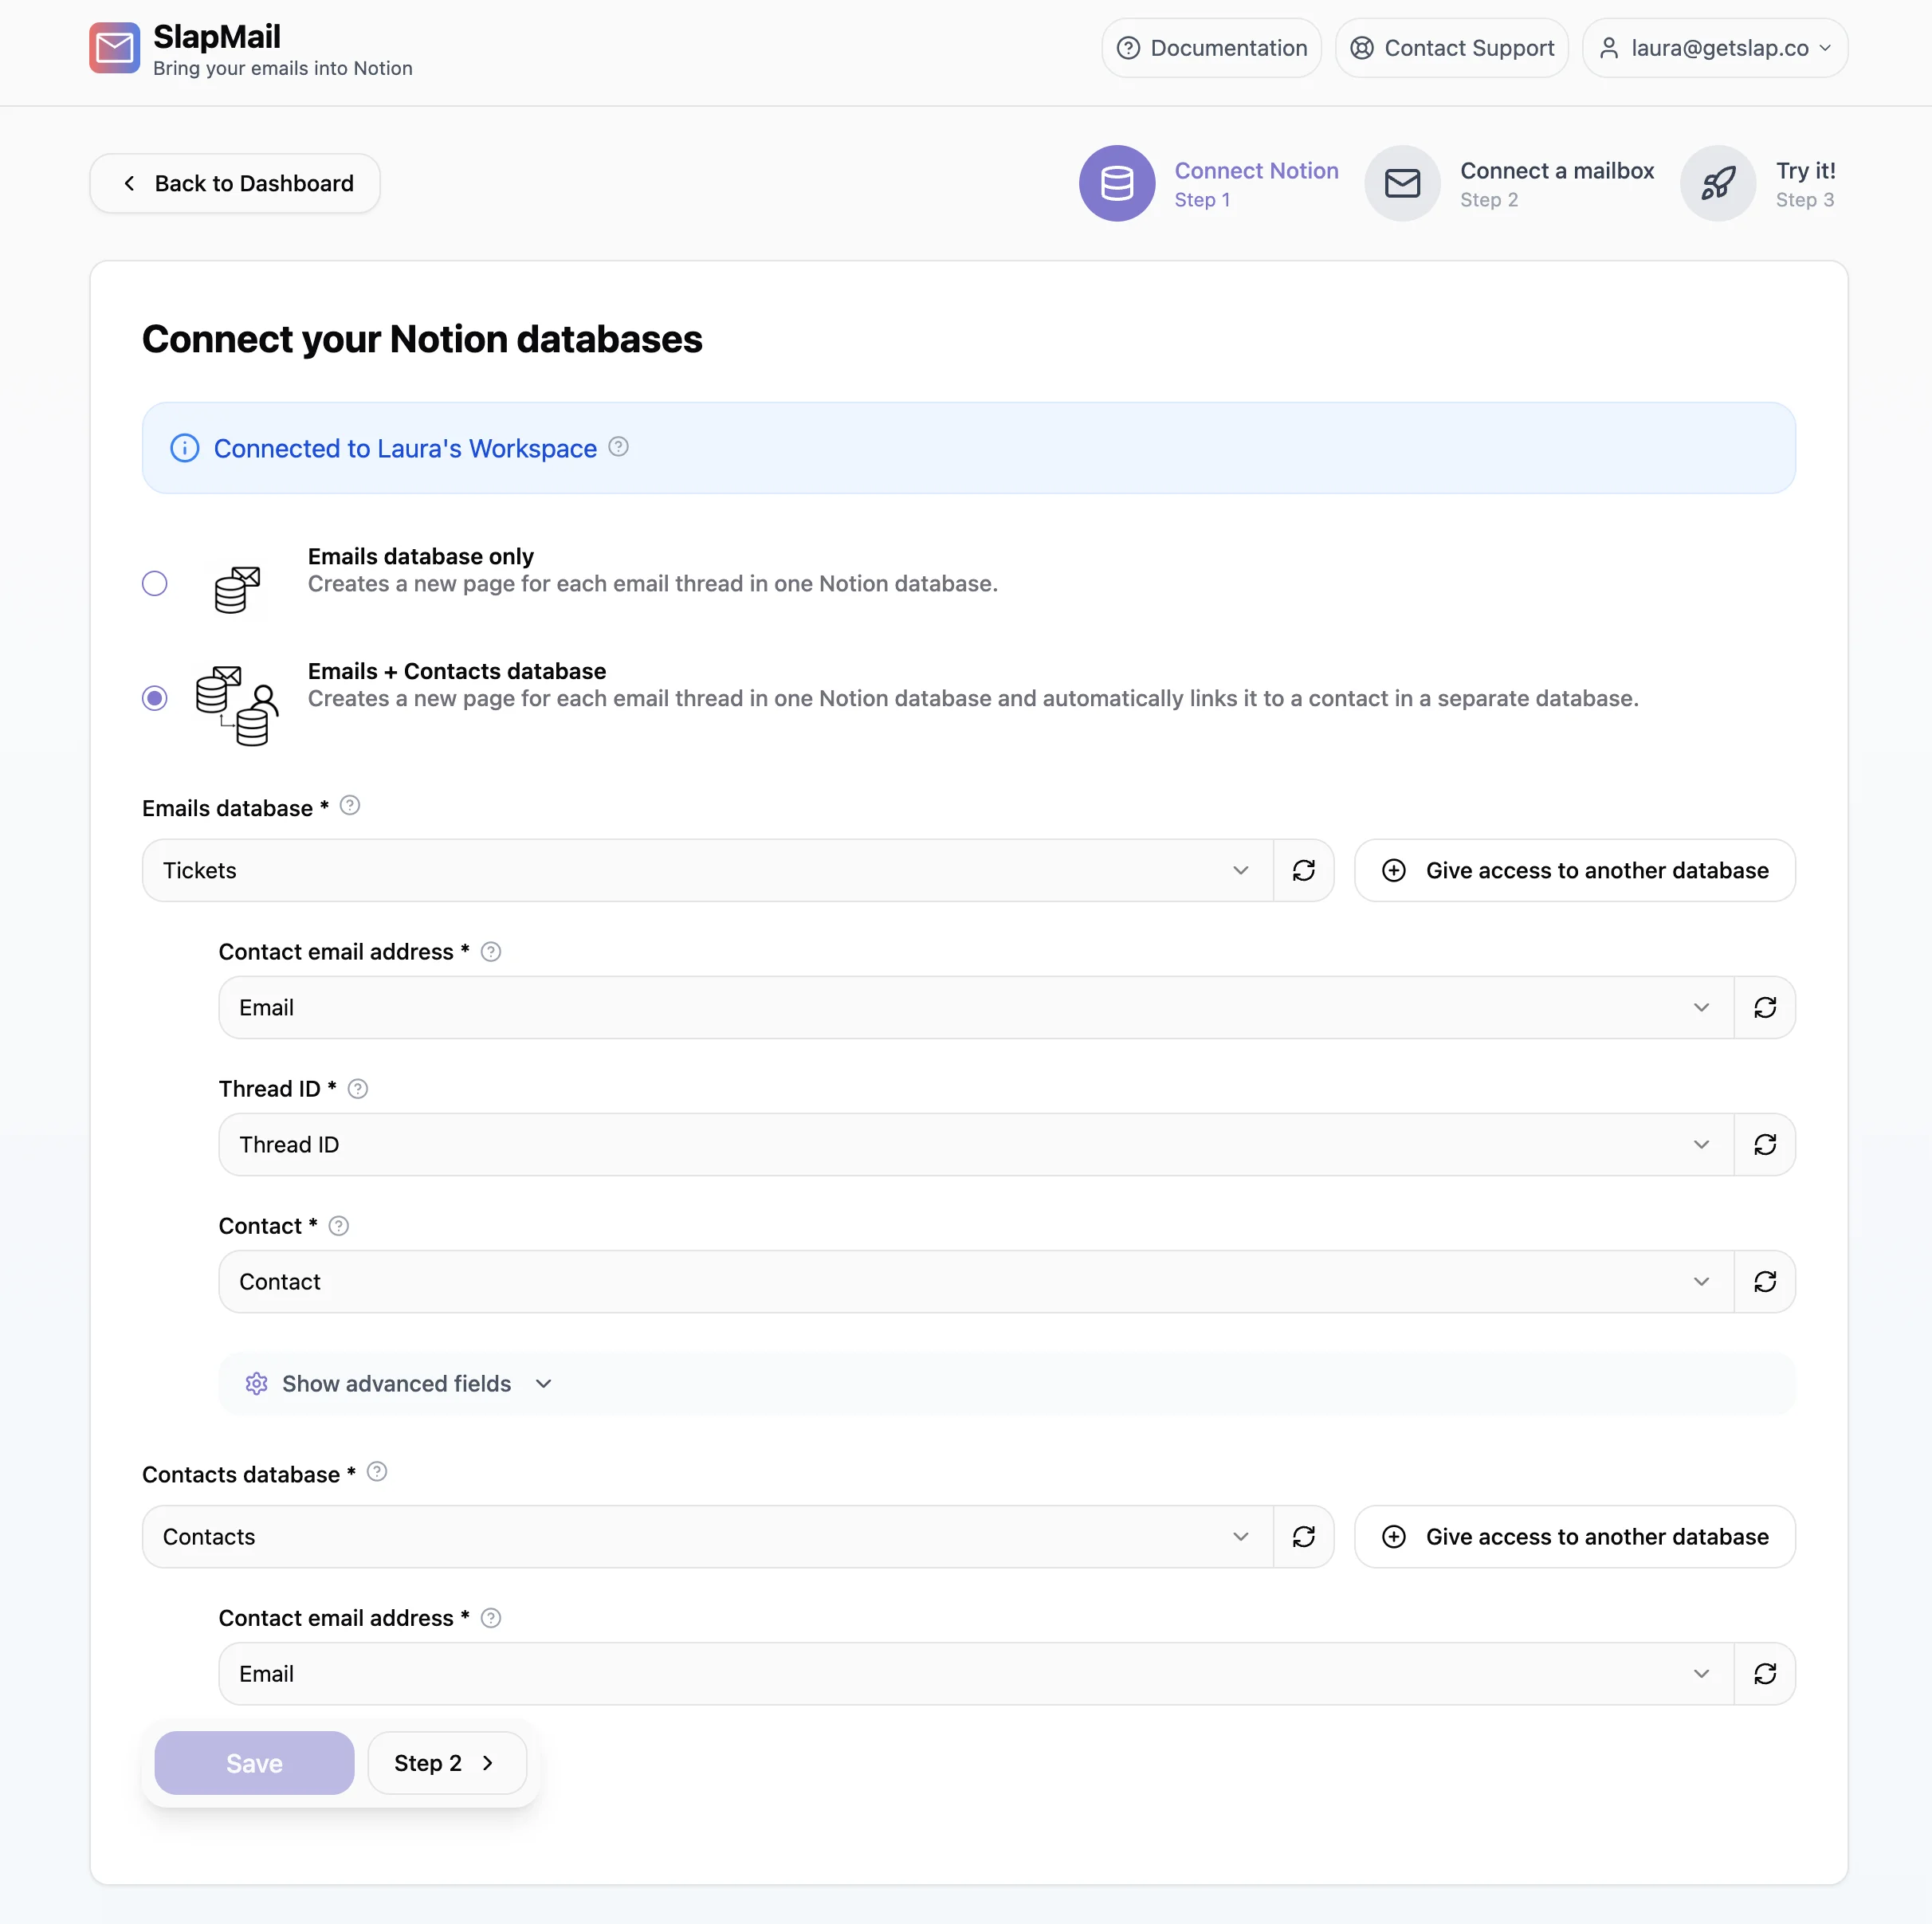
- Share your database with SlapMail - In SlapMail, click “Share access to your Notion database” and grant access.
- Select your database - Choose your tickets database and map your Notion properties:
- Contact email address → Must be mapped with a Notion property of type text.
- Thread ID → Must be mapped with a Notion property of type text.
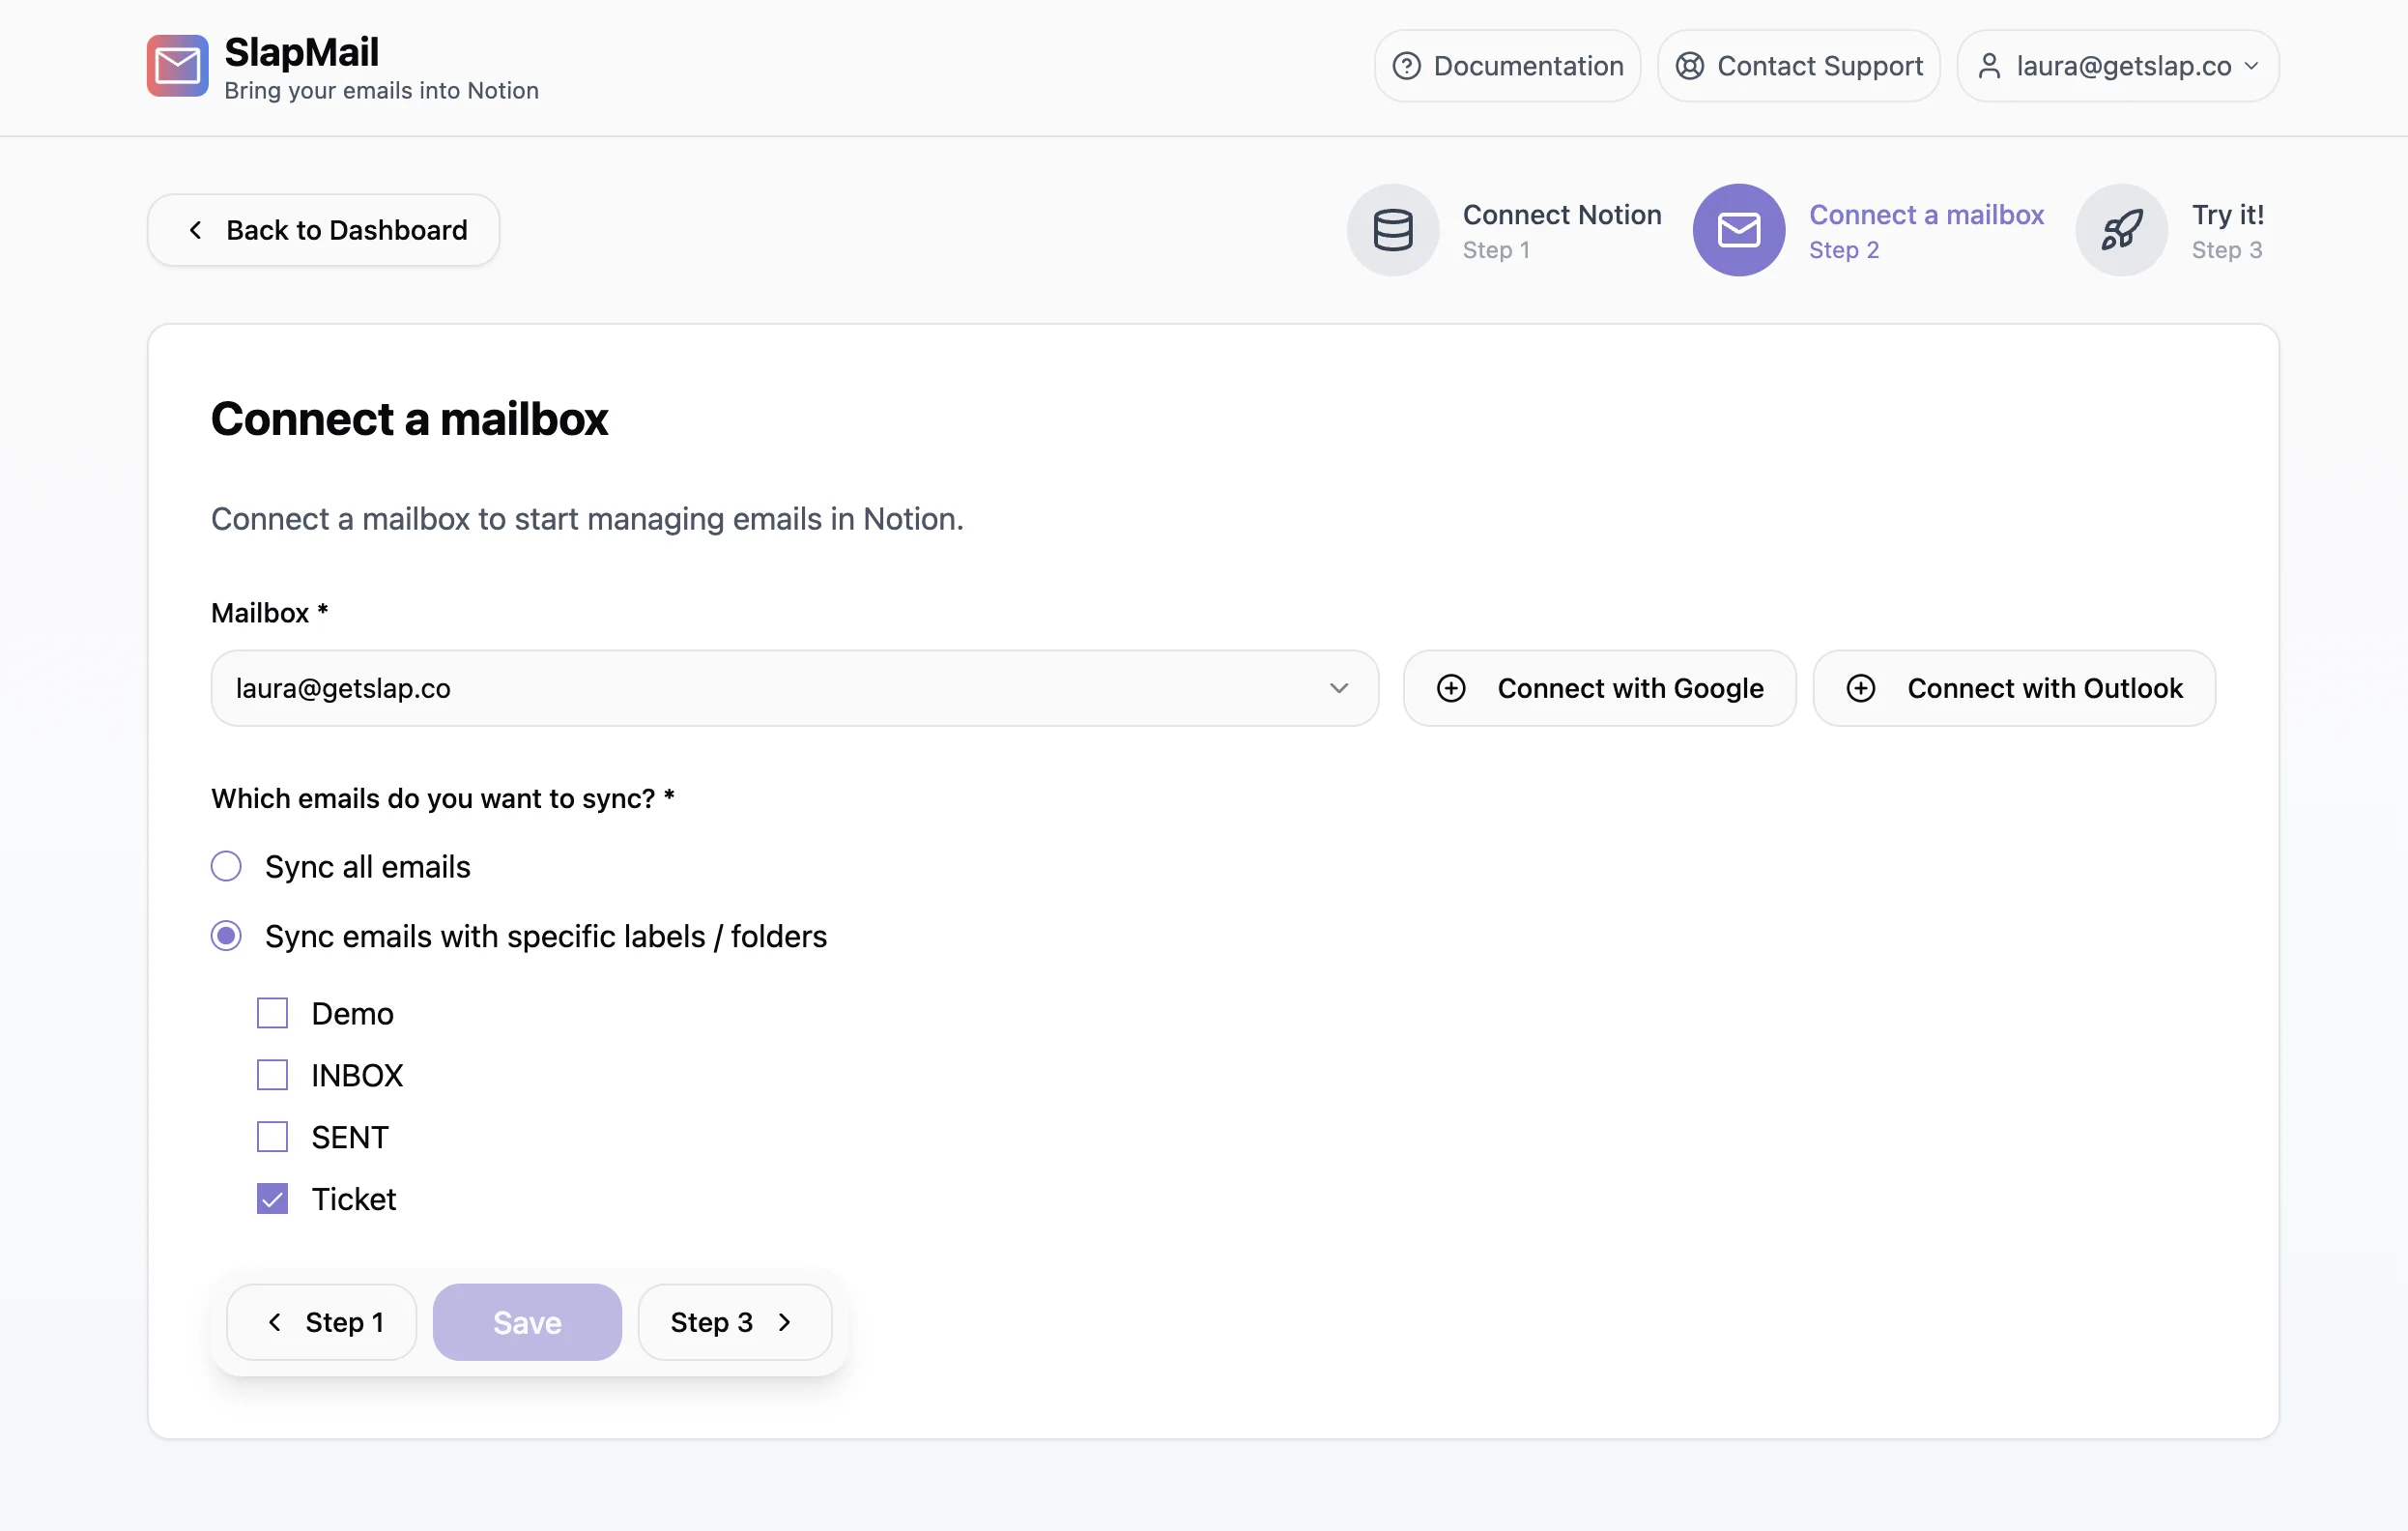
- Connect your mailbox - Add your support Gmail or Outlook account.
- Choose which emails to sync - All emails, or filter by label/folder.
- Test it - Send yourself a test email and verify it appears in Notion. You can also test to reply via the comment section.
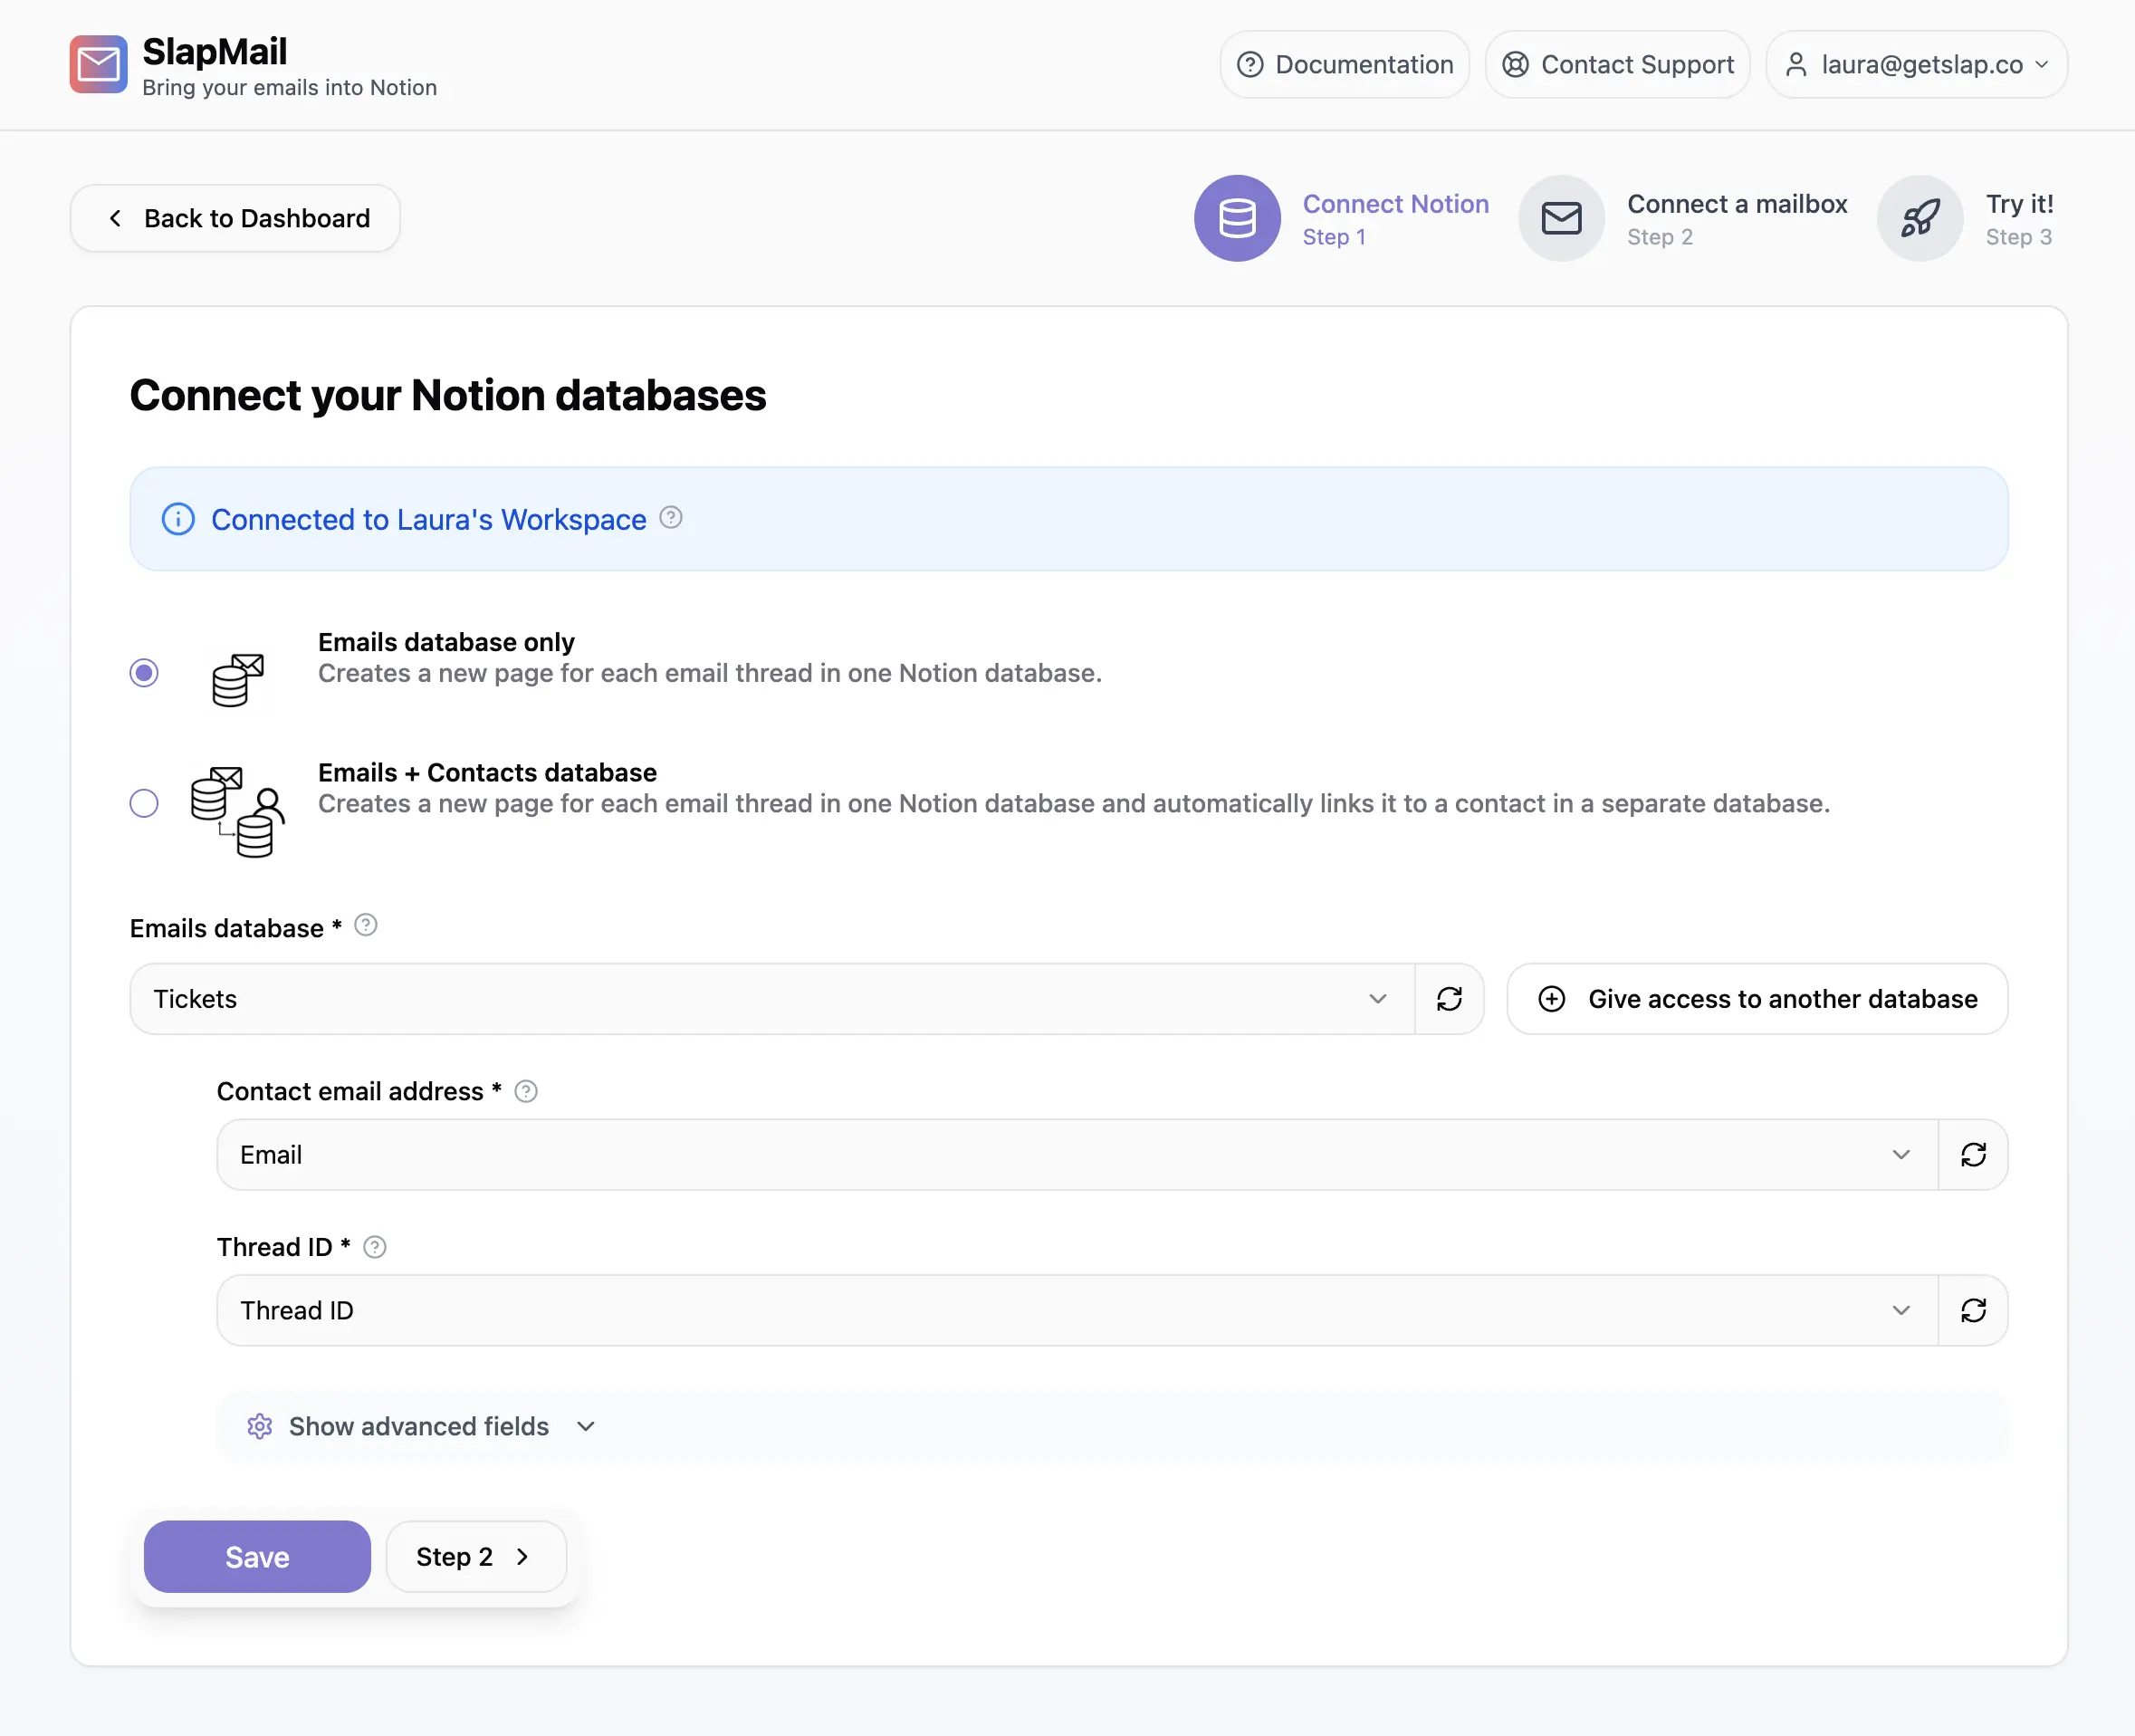
With Contacts database (2-databases mode)
If you’re using a Contacts database:
- Share both databases with SlapMail.
- Select “Email + Contact database” sync type.
- Map your Tickets database properties (same as above):
- You’ll also need to map Contact with a relation Notion property (that makes the link with your contact database).
- Map your Contacts database properties:
- Select your Contact database
- Contact’s email address must be mapped with a text or email property in Notion.
- Test by sending an email from an address that exists in your Contacts - it should auto-link.
Full setup documentation | 2-database mode documentation
The full workflow
Now that your system is set up, here’s what the day-to-day looks like - from receiving a ticket to closing it.
Ticket arrives
Tickets can enter your system in three ways:
From emails (Gmail or Outlook)
The most common setup: connect your support mailbox (e.g., help@company.com ) and every incoming email becomes a ticket within seconds.
Sync your entire mailbox - Ideal for a dedicated support address. Every new email creates a ticket automatically. If you’re using 2-database mode, SlapMail links the ticket to the matching contact.
Sync only specific emails - If you don’t want every email in Notion, filter by label (Gmail) or folder (Outlook). When an email is labeled or moved to that folder, it syncs. You can add labels manually or set up rules in Gmail/Outlook to do it automatically.
SlapMail is flexible: you can sync multiple mailboxes to the same database, or route different labels to different databases. See the full filtering documentation .
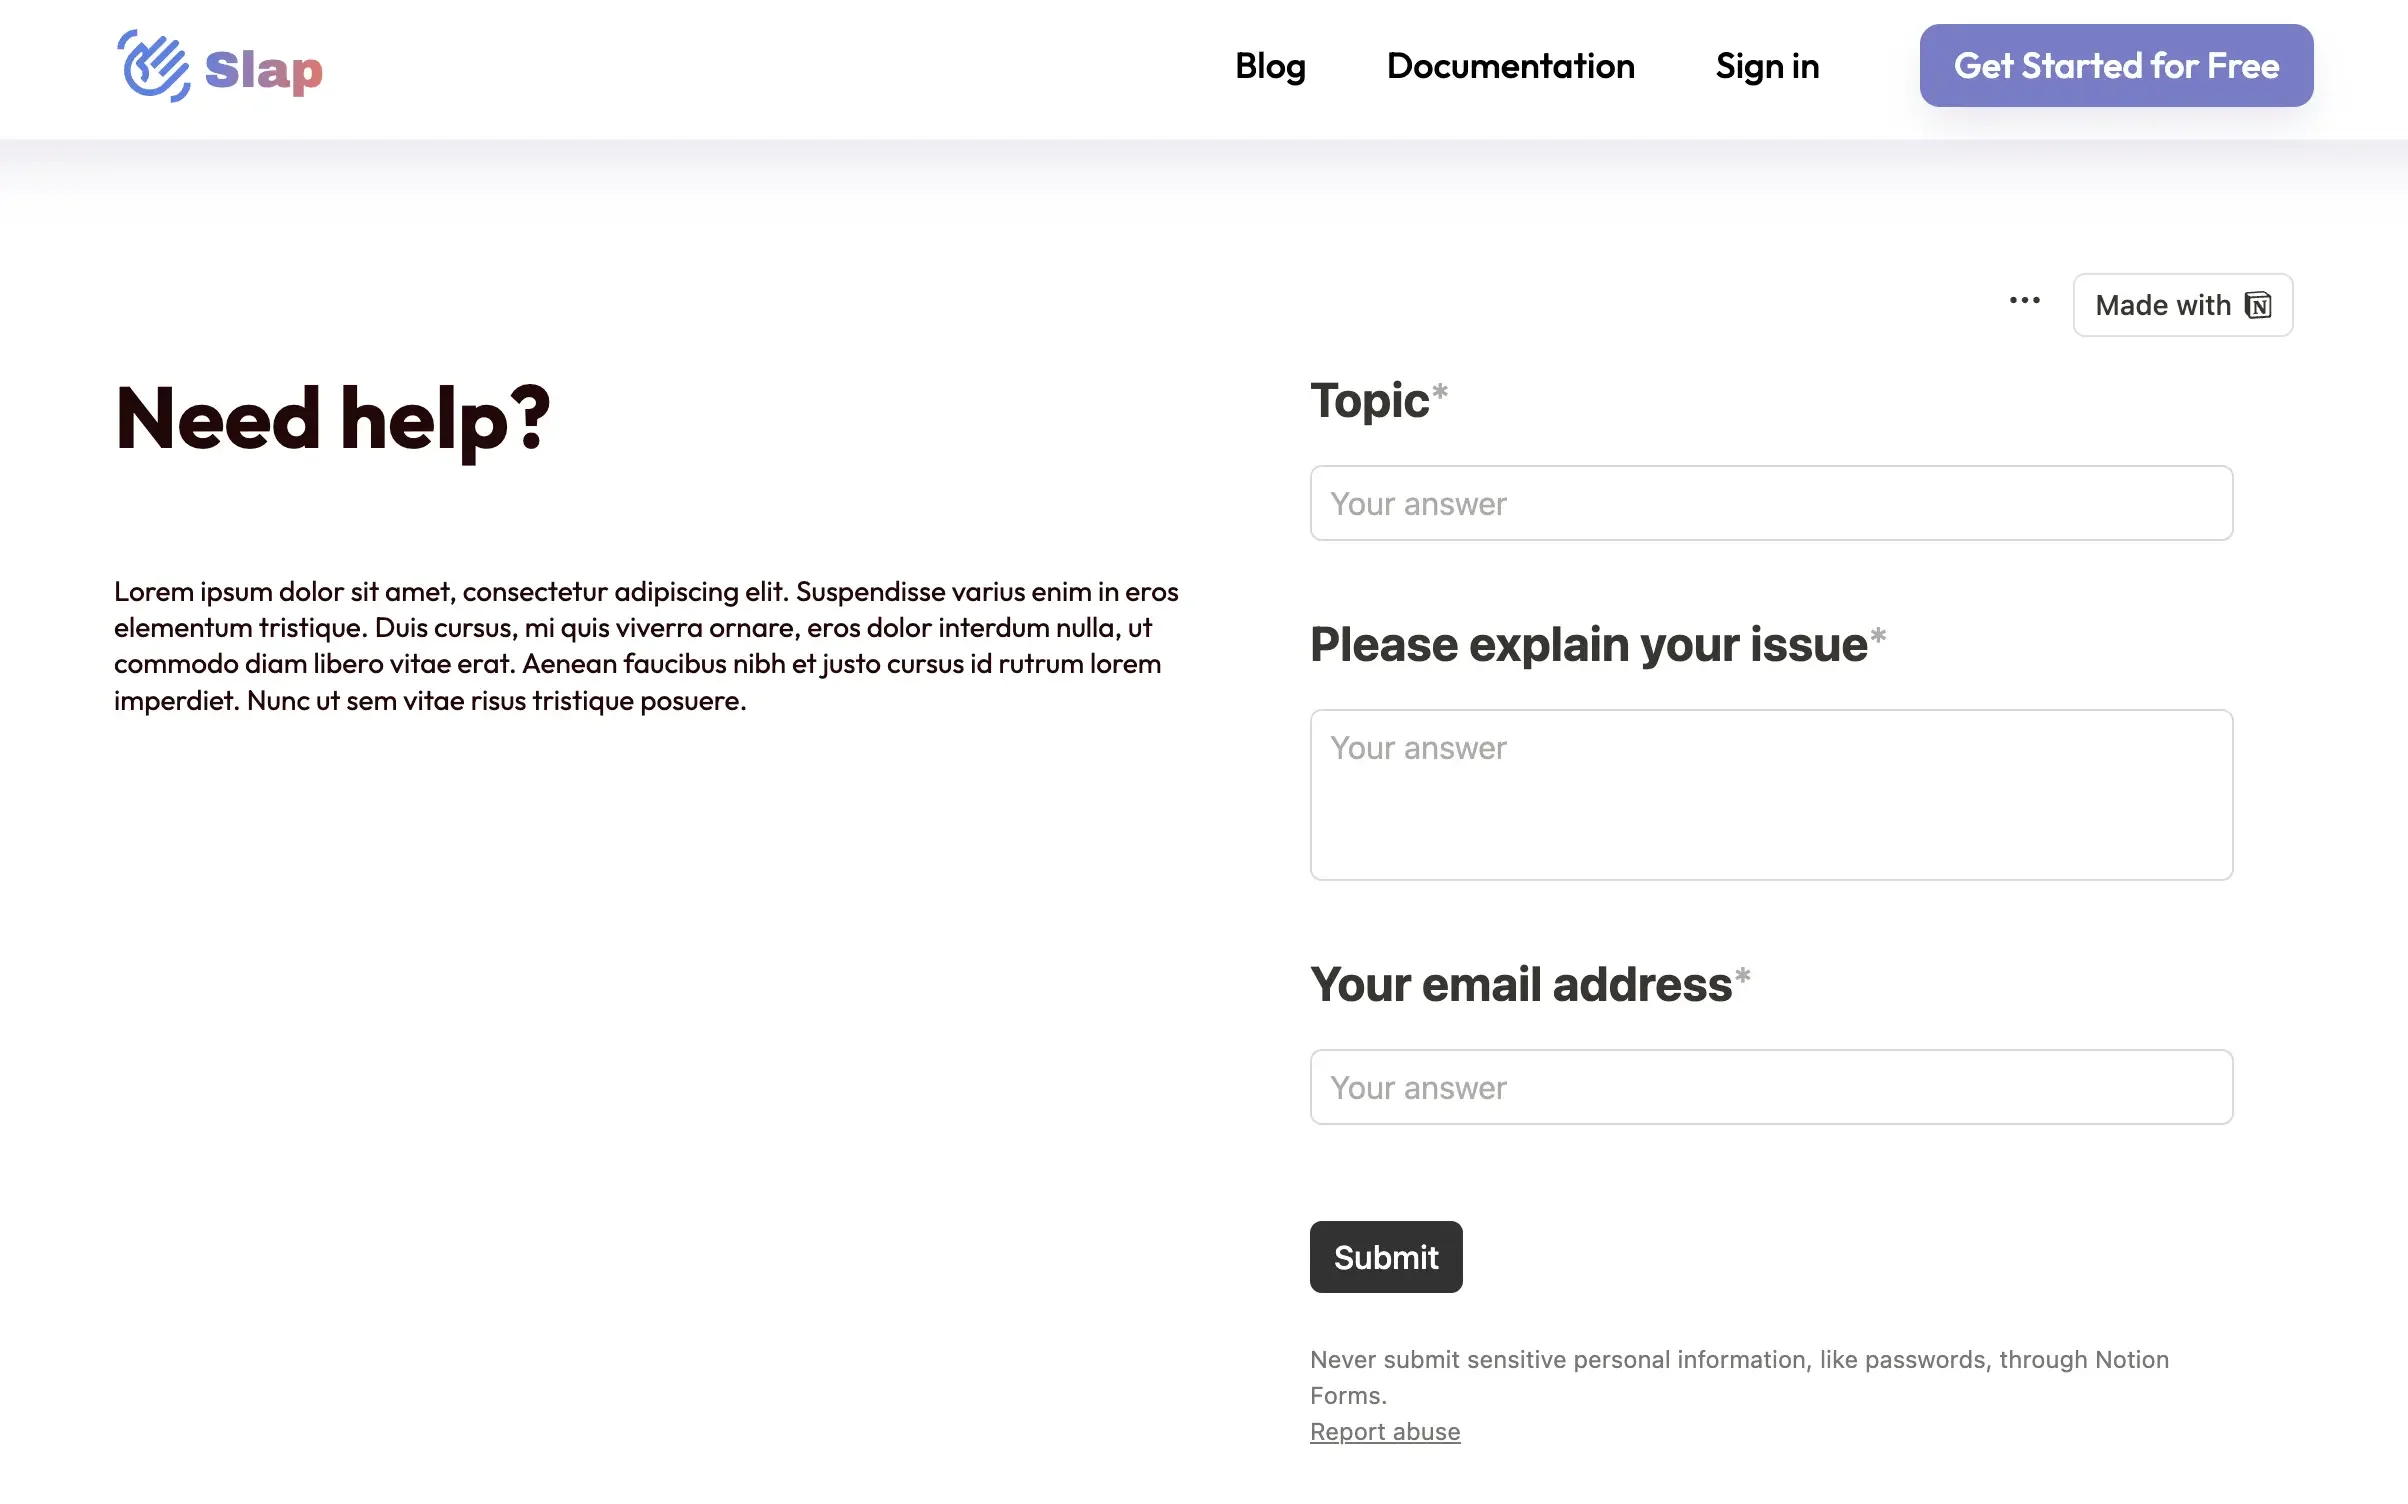
From forms
Forms let customers submit structured requests - they fill in specific fields instead of writing a freeform email. This gives you cleaner data and guides customers to provide the information you actually need to help them.
Why use a form?
- Categorize from the start - Ask for request type (bug, feedback, billing question), the account or project affected, or which product area it relates to.
- Get the details upfront - For bug reports, ask for steps to reproduce, current behavior, and expected behavior. For account issues, ask for the email or account name. The right questions save back-and-forth.
- Cleaner tickets - Form responses map directly to your database properties, so tickets arrive pre-tagged and ready to triage.
How it works: A customer fills out your form → a ticket is created in your database with properties pre-filled → you reply from Notion → they receive your response by email. Full two-way communication, starting from a form.
The key requirement: Your form must collect the customer’s email address. SlapMail uses this to send replies back to them.
Notion Forms are the easiest option - create one directly from your Tickets database and publish it or embed it on your website . Other form tools that sync with Notion (e.g., Tally) work too.
For a complete walkthrough of building a ticketing system with Notion Forms + SlapMail, see this guide .
Manually created
Sometimes a customer reaches out by phone or chat instead of email. You can still track it in your ticketing system - just create the ticket yourself.
- Add a new page to your Tickets database
- Fill in the Contact emails property with the customer’s email address
- Write your message in the comments section - SlapMail will send it as a new email
This isn’t the default workflow (emails and forms are more reliable), but it’s useful when you need to log a conversation that started outside email.
Important: Make sure the email address is set before you reply - SlapMail needs it to know where to send the message.
Full documentation on starting new conversations from Notion
Triage, reply, close
One email thread = one ticket. SlapMail groups all messages in the same email thread into a single ticket page. This keeps your board clean and your conversations organized - no duplicate tickets, no scattered replies.
When a new ticket arrives, triage it:
- Assign it - Set the “Assigned to” property so everyone knows who’s handling it. On a small team, you might self-assign. Larger teams might have a rotation or let people pick from the queue.
- Set priority - High, Medium, or Low. If you’re using color formatting on your board, high-priority tickets will stand out immediately.
- Add tags - Categorize by type (Technical, Billing, Feedback) so you can filter and report on patterns later.
- Move to In Progress - Drag the ticket to the right column or update the Status property.
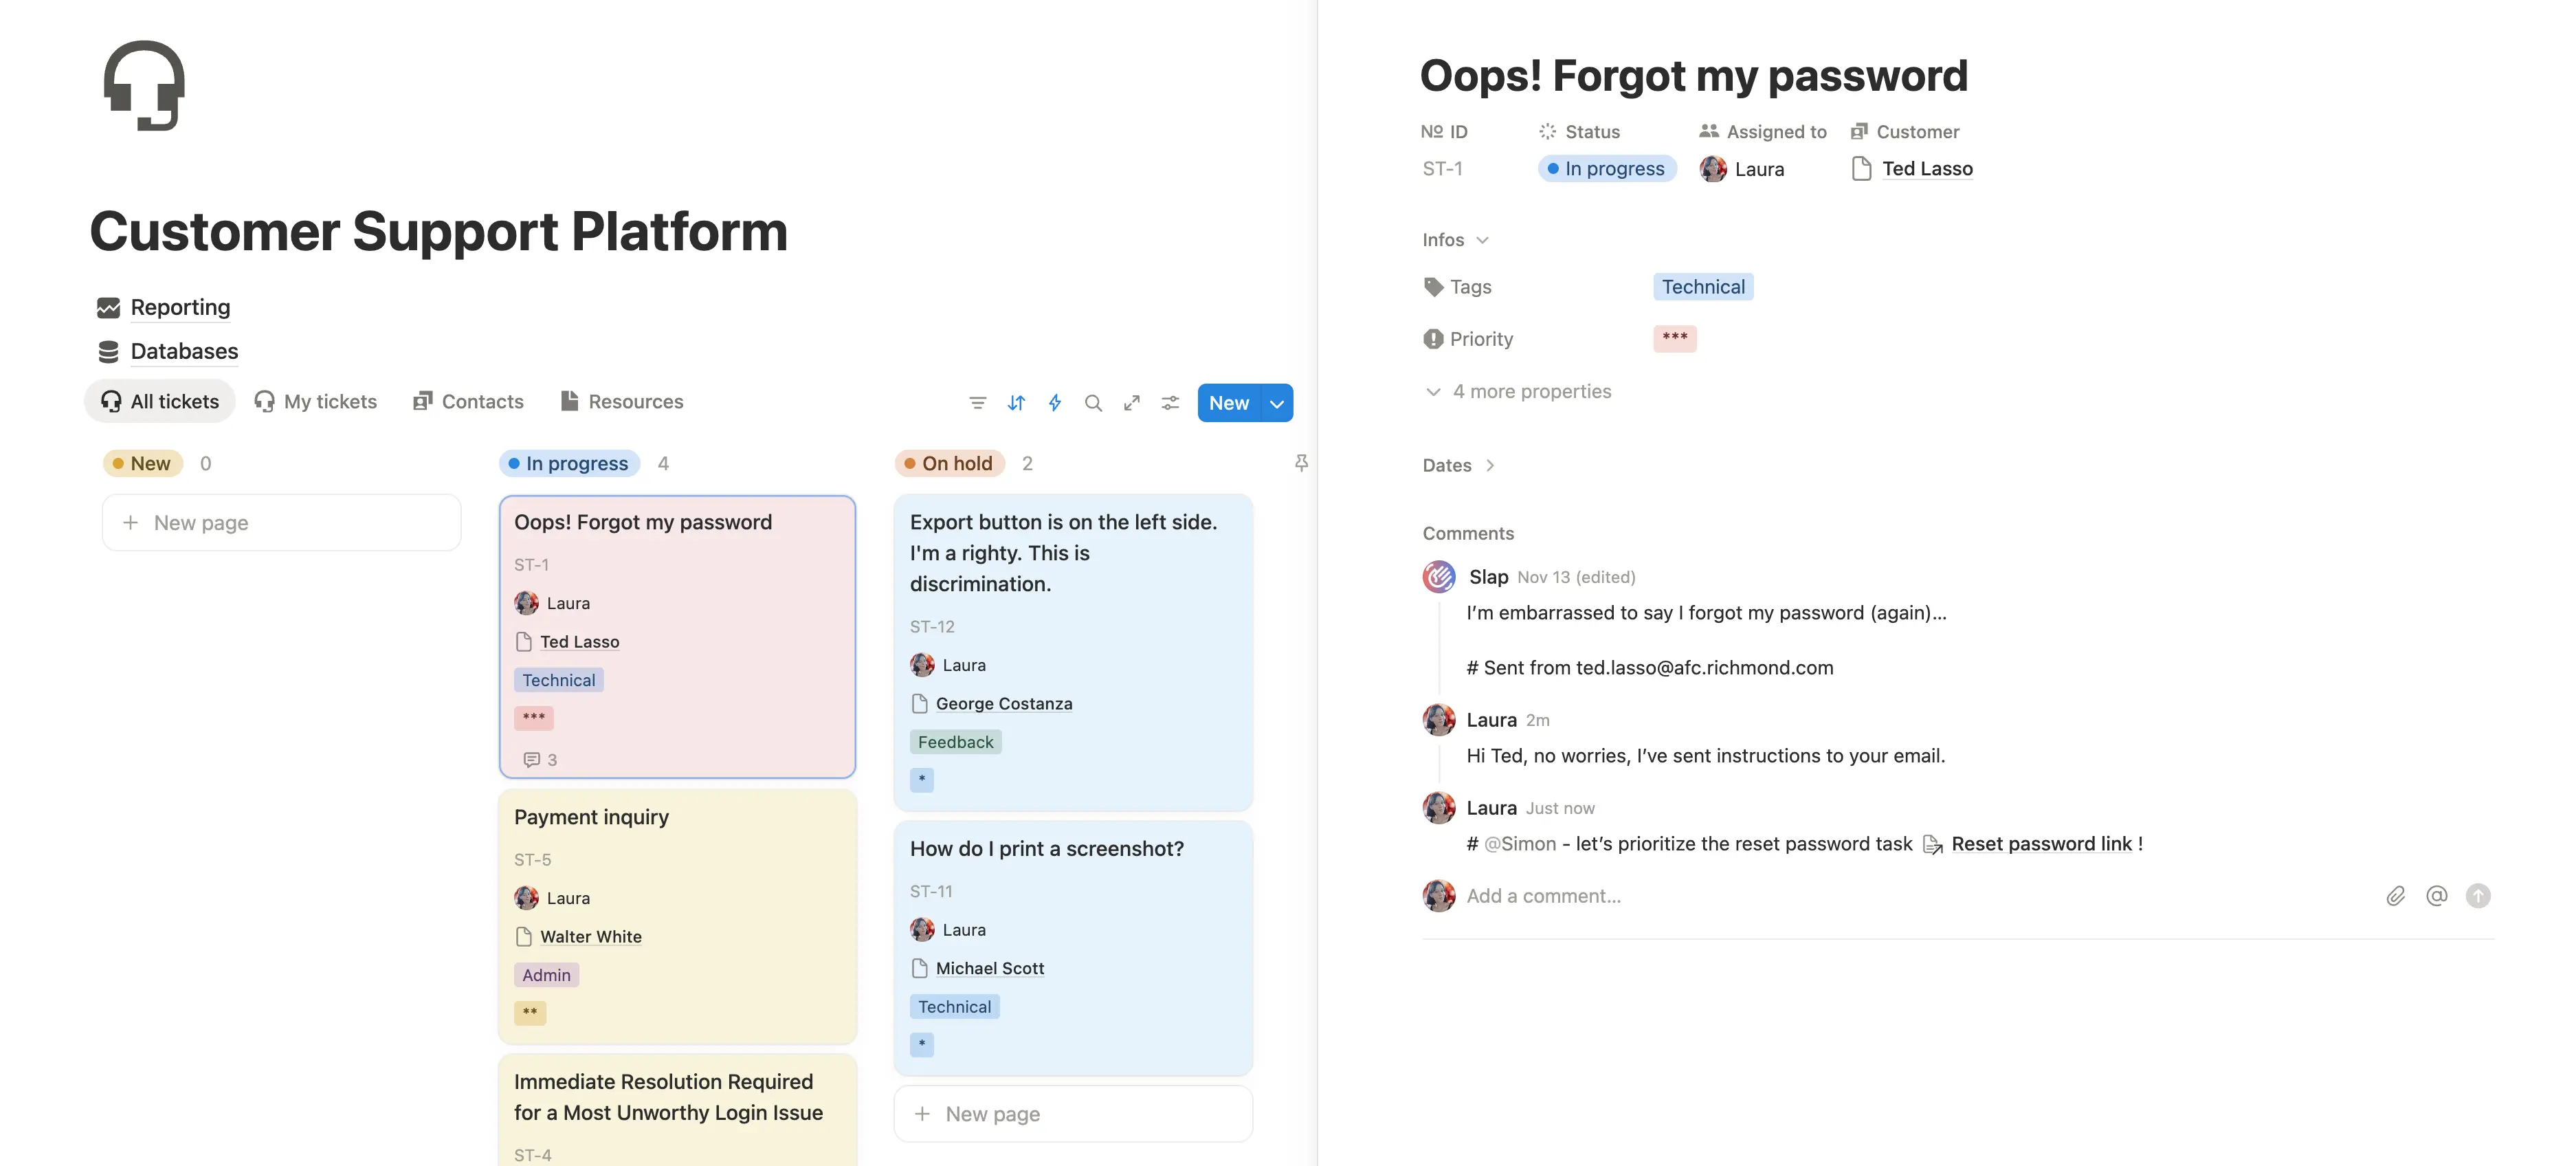
Replying
Open the ticket and add a comment - SlapMail sends it as an email reply to the customer. The full conversation stays attached to the ticket page.
Need input from a colleague? Start your comment with # to keep it internal - SlapMail won’t send it to the customer. Mention teammates with @ to notify them in Notion. More on internal comments
Prefer replying from your mailbox? That’s fine. Replies sent from Gmail or Outlook still sync back to the ticket, so the conversation stays complete.
Closing the ticket
When the issue is resolved, move the ticket to Done. If you’re waiting on the customer, use On Hold.
That’s the workflow: triage, reply, close. Notion + SlapMail keeps it organized and predictable - no shared inbox chaos, no lost threads, no “who’s handling this?” confusion.
It doesn’t end there
Don’t delete closed tickets - they’re valuable. Your tickets database becomes an asset that the rest of your company can use:
- Product can spot patterns, prioritize features, and link bugs to the backlog. When you ship a fix, you know exactly who reported it.
- Sales can review a customer’s history before a renewal conversation - what issues they faced, what features they requested, how responsive they were.
- Marketing can identify common pain points and discover the topics that resonate with users.
In a siloed helpdesk tool, this information stays locked in the support team. In Notion, it can be made accessible to everyone who needs it.
Automations & power features
Since your tickets live in Notion, you get full access to Notion’s automation engine. Trigger actions when properties change, set conditions, and build workflows that run automatically.
Here are the most useful automations for a ticketing system. Most require the Last Received Email Date property, which SlapMail can update automatically. Set it up in your sync settings .
For more features and advanced setups, see the full documentation .
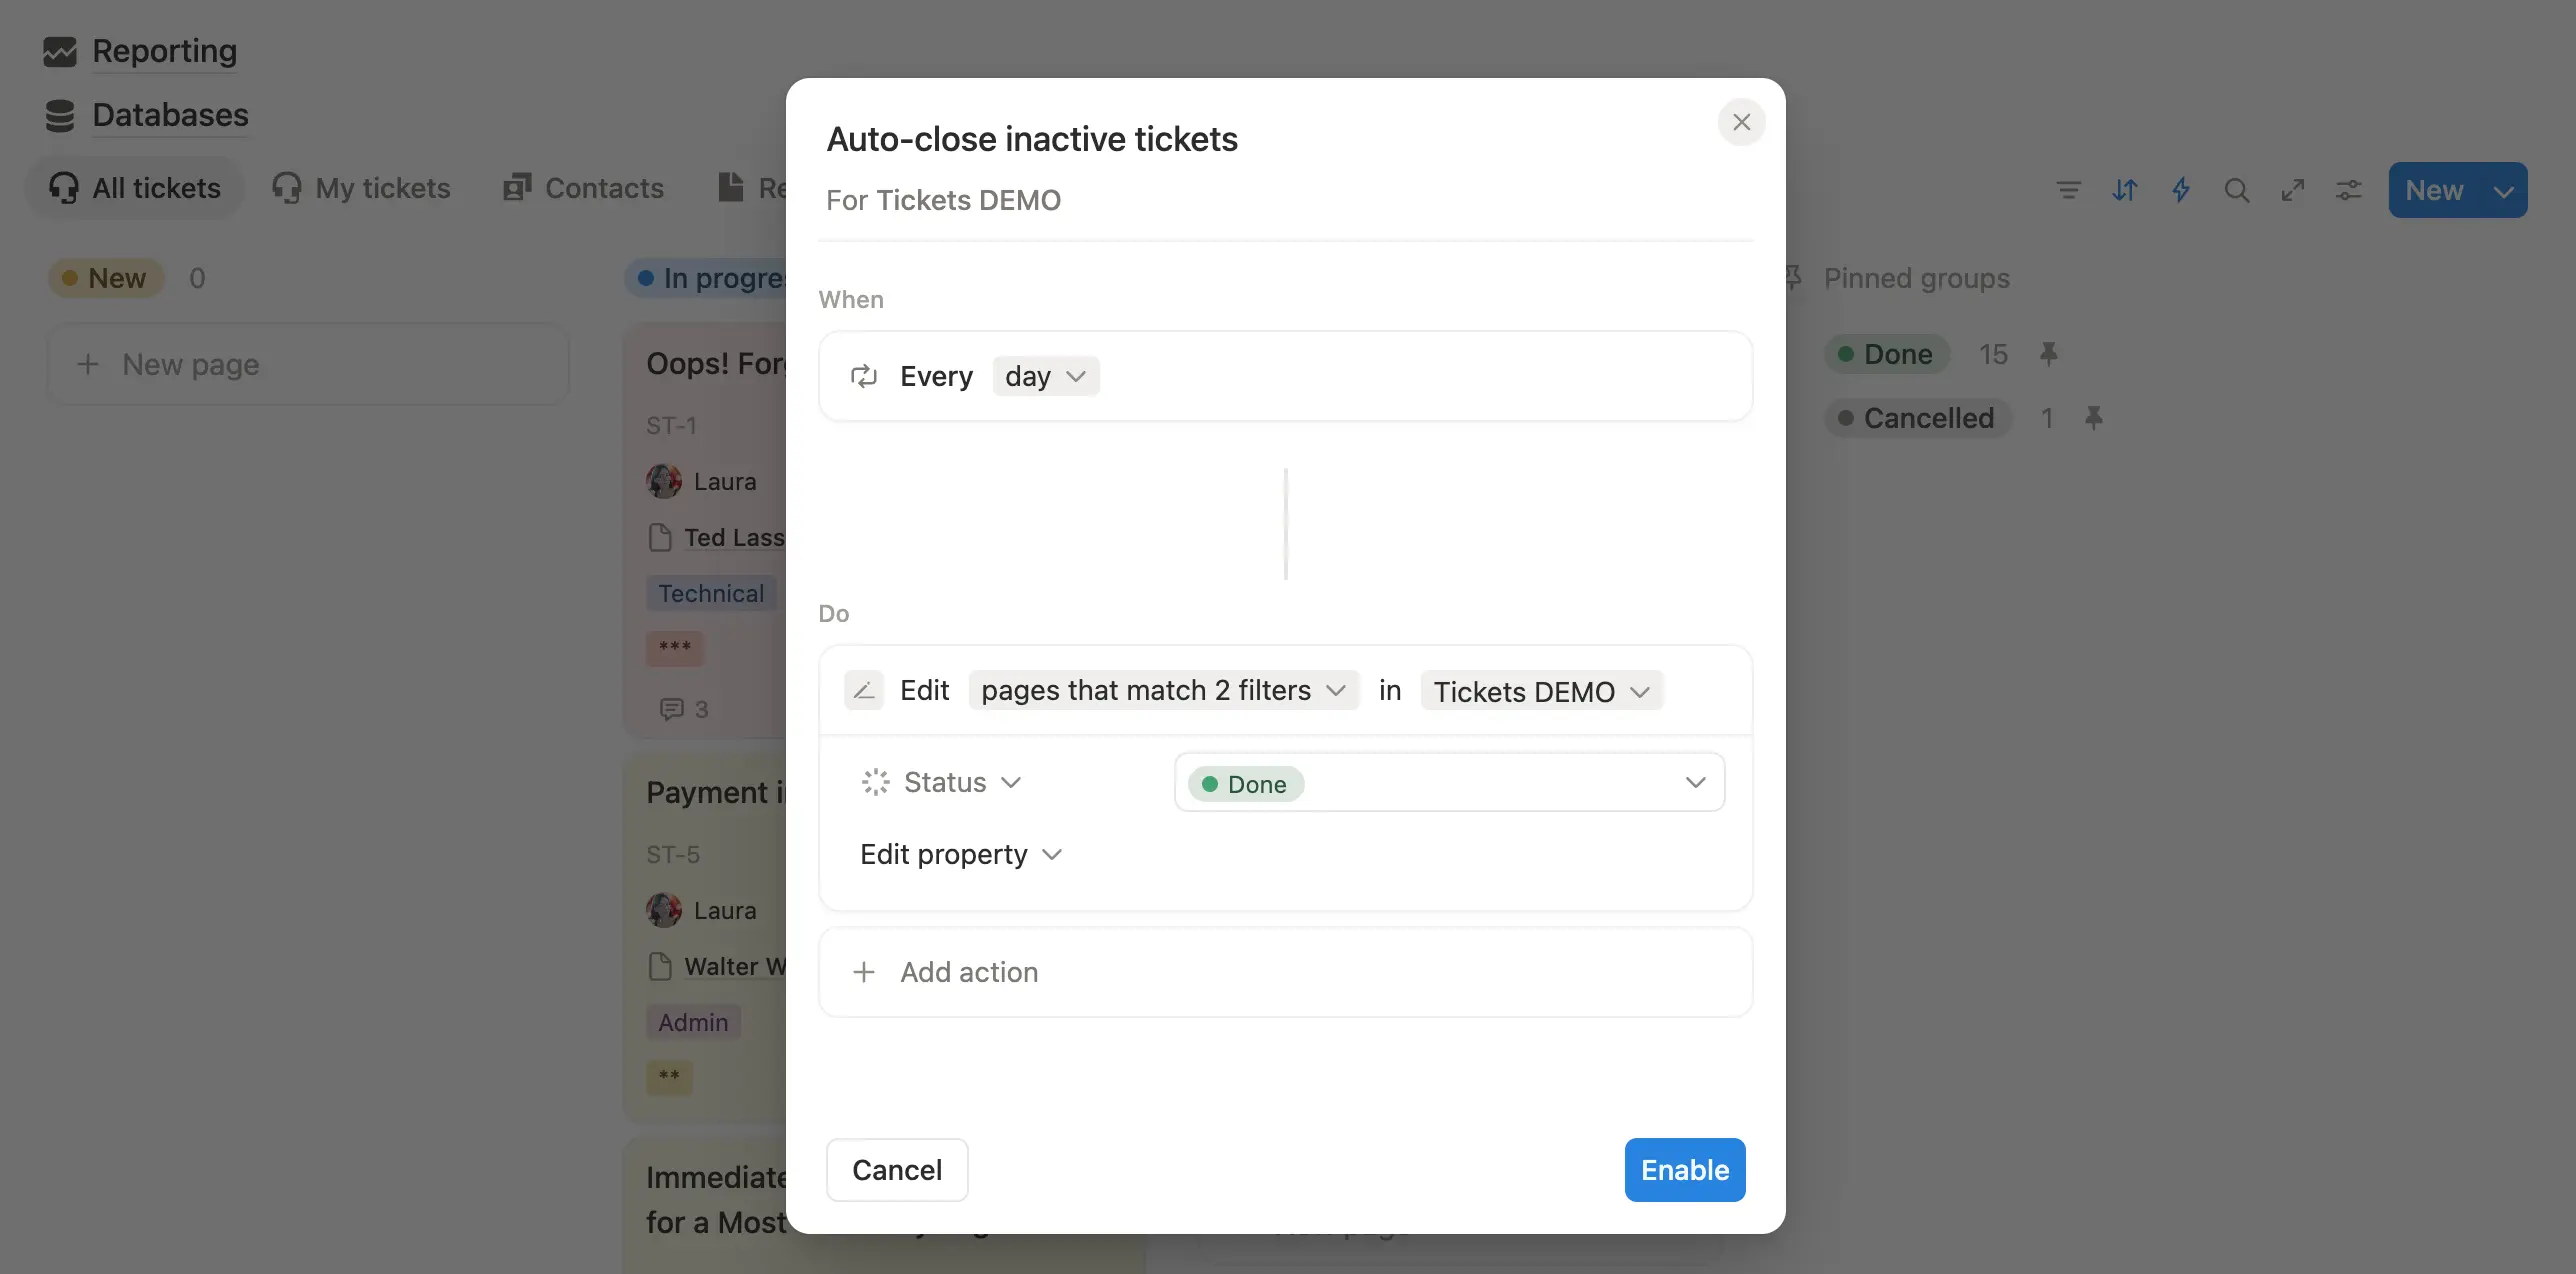
Auto-close inactive tickets
Close tickets automatically when a customer doesn’t respond after a set number of days. This keeps your board clean and prevents stale tickets from cluttering the queue.
Setup: Create an automation that triggers when Last Received Email Date is more than X days ago (e.g., 7 days) and Status is on Hold. Action: set Status to Done.
Auto-reopen when customer replies
If a customer replies to a closed ticket, automatically reopen it so your team sees it and responds.
Setup: Create an automation that triggers when Last Received Email Date changes and Status is Done. Action: set Status to In Progress (or New).
Get notified when a new email arrives
If a customer replies to a ticket, you probably want to notify the person assigned to the ticket.
Setup: Create an automation that triggers when Last Received Email Date changes. Action: notify the person assigned to the ticket.
Create a new ticket instead of reopening
Some teams prefer to keep closed tickets closed and create a fresh ticket when a customer replies to an old thread. This keeps each issue as its own ticket.
How it works: When a ticket is closed, an automation clears the Thread ID property. When a new email arrives in that thread, SlapMail creates a new ticket instead of updating the closed one.
Auto move from On Hold to In Progress
When a customer replies to a ticket that’s On Hold (waiting for their response), move it back to In Progress so your team knows they need to act.
Setup: Create an automation that triggers when Last Received Email Date changes and Status is On Hold. Action: set Status to In Progress.
Signatures (Gmail only)
Add your Gmail signature automatically to emails sent from Notion. The signature won’t appear in the Notion comment - it’s added when the email is sent.
Setup: Enable “Add Gmail signature” in your SlapMail settings. Make sure you’ve set a default signature in Gmail under “For new emails use.”
Metrics & reporting
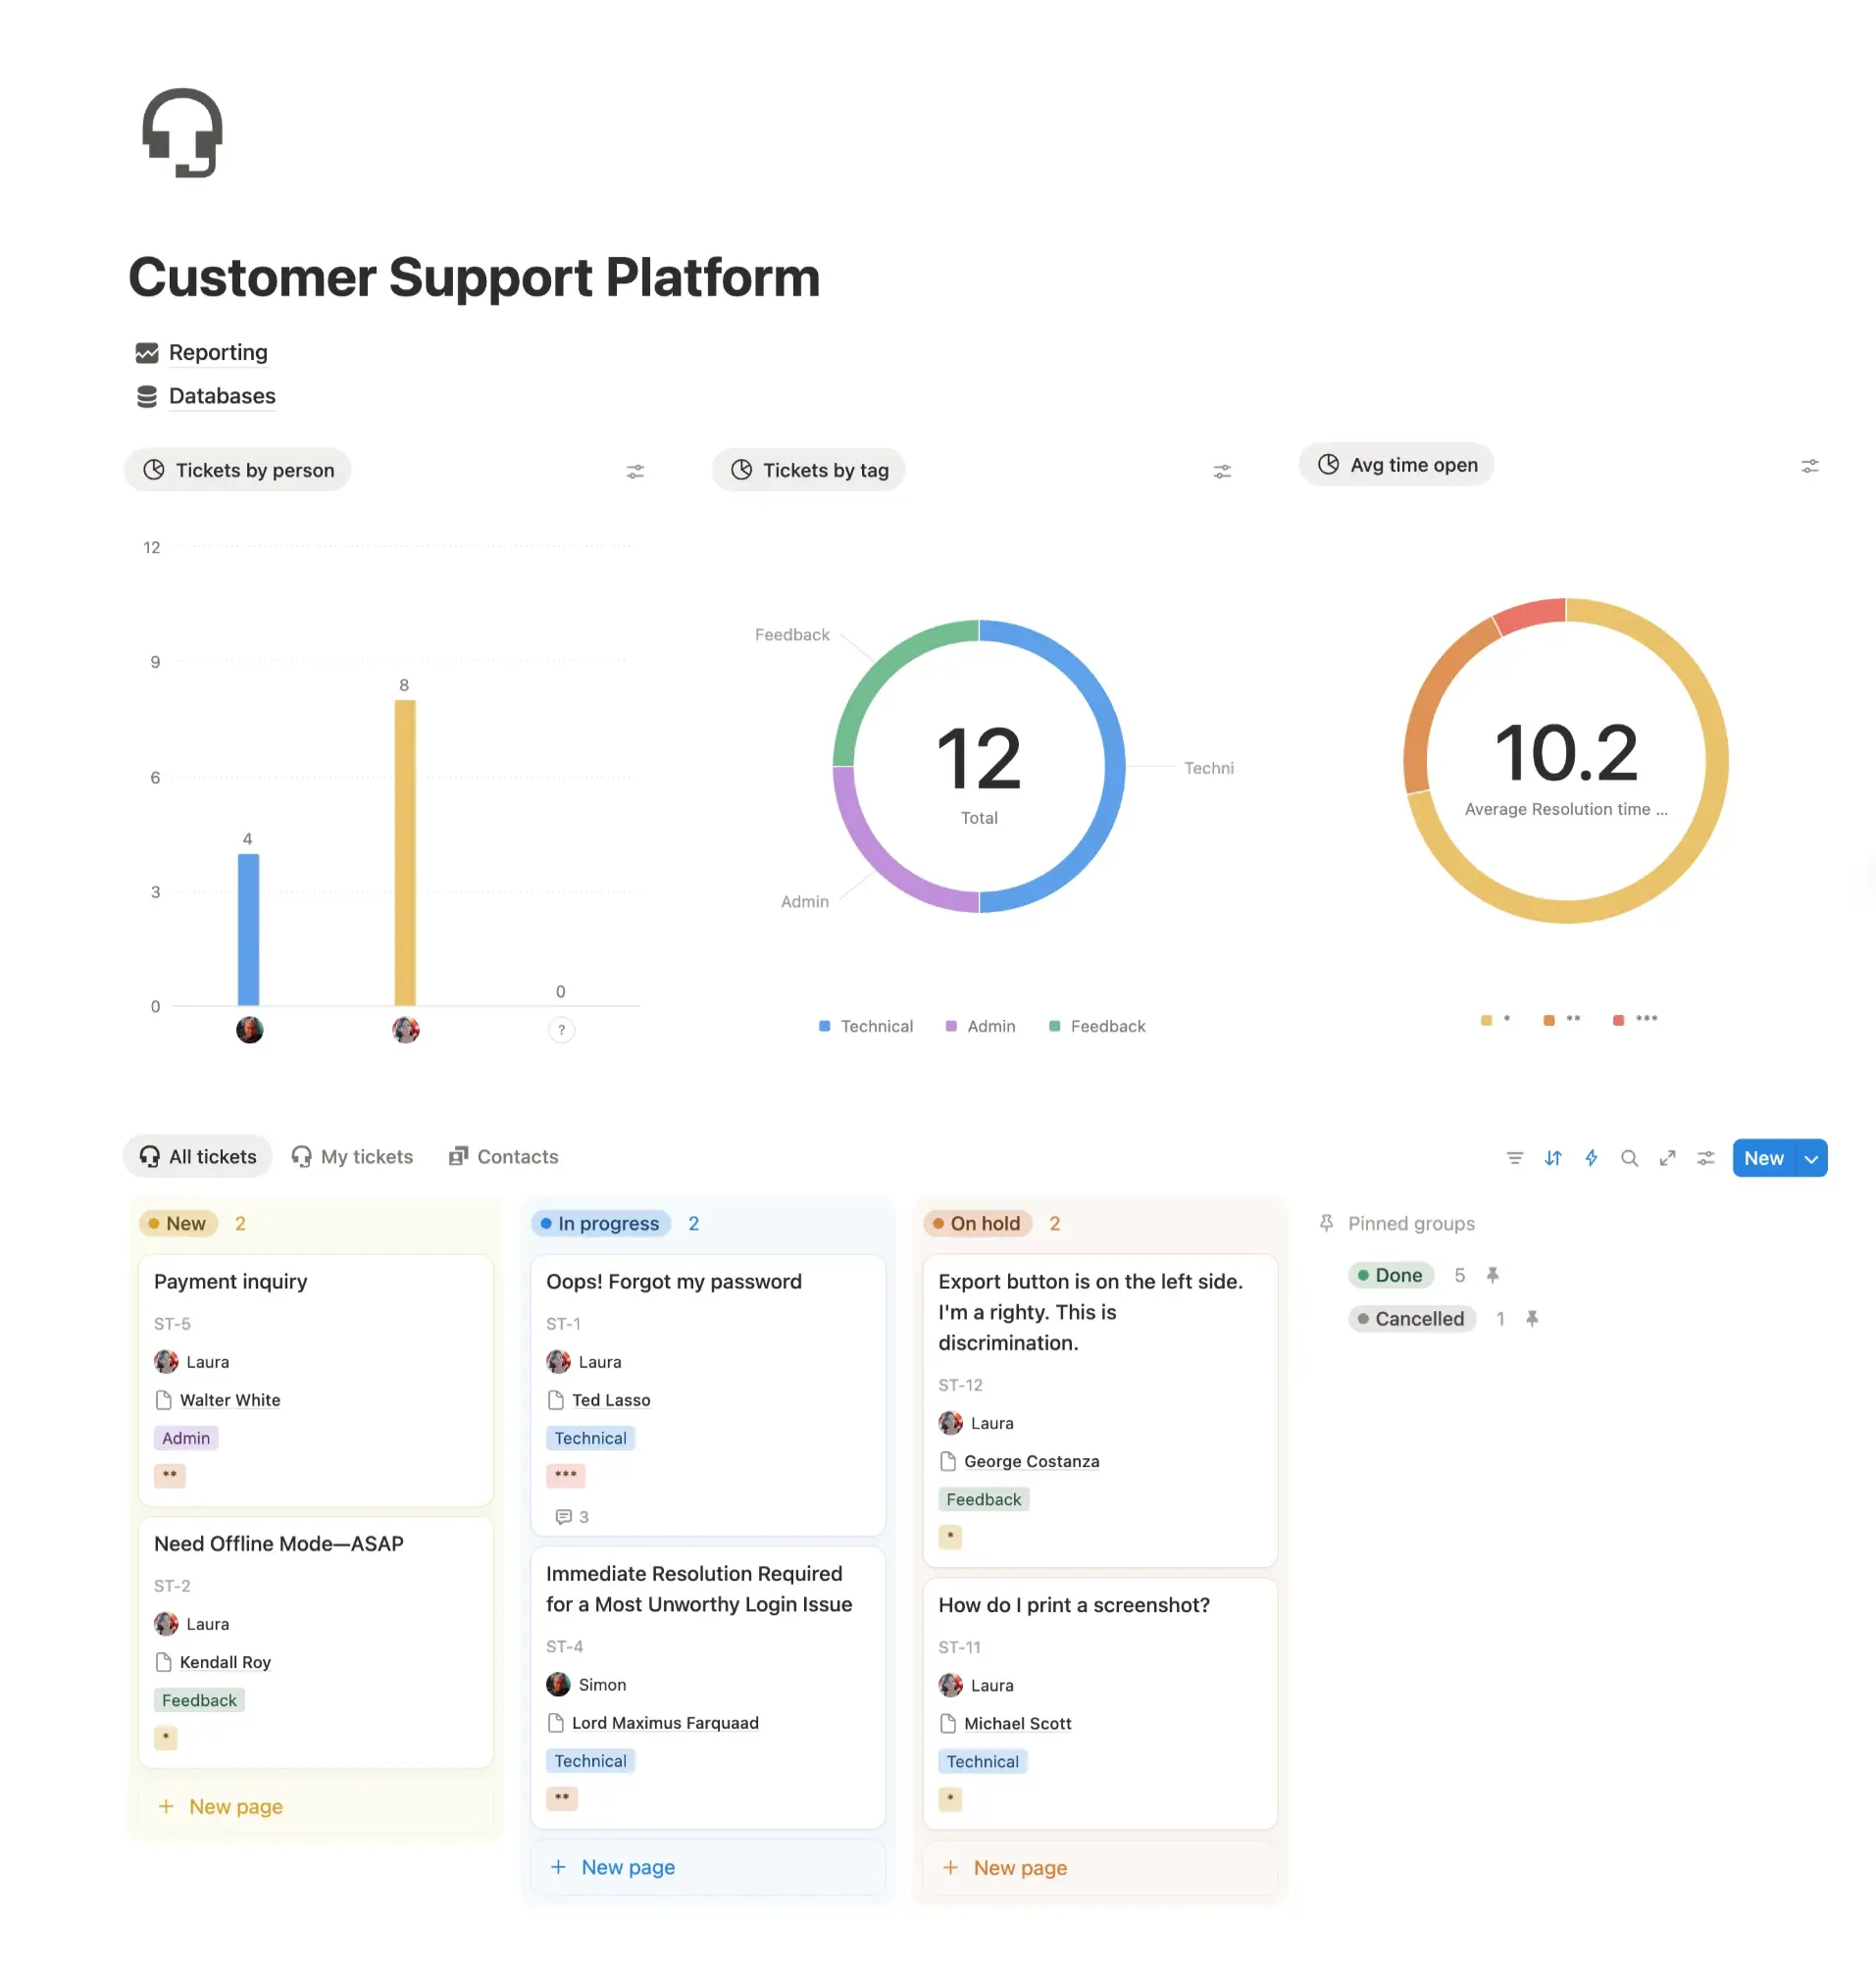
Once your system is running, you’ll want to track how it’s performing. Notion’s chart views make this easy - no external dashboards needed.
Where to put your charts: Some teams display them at the top of the tickets board for quick stats. Others prefer a dedicated Reporting page. Both work - choose what fits your workflow.
Tracking resolution time
To measure how long tickets stay open, you need two properties:
Closed on (date) - Set automatically when a ticket is closed.
- Create an automation: when Status is set to Done, set Closed on to Now.
Time open (formula) - Calculates the number of days between the ticket’s created date and the closed date.
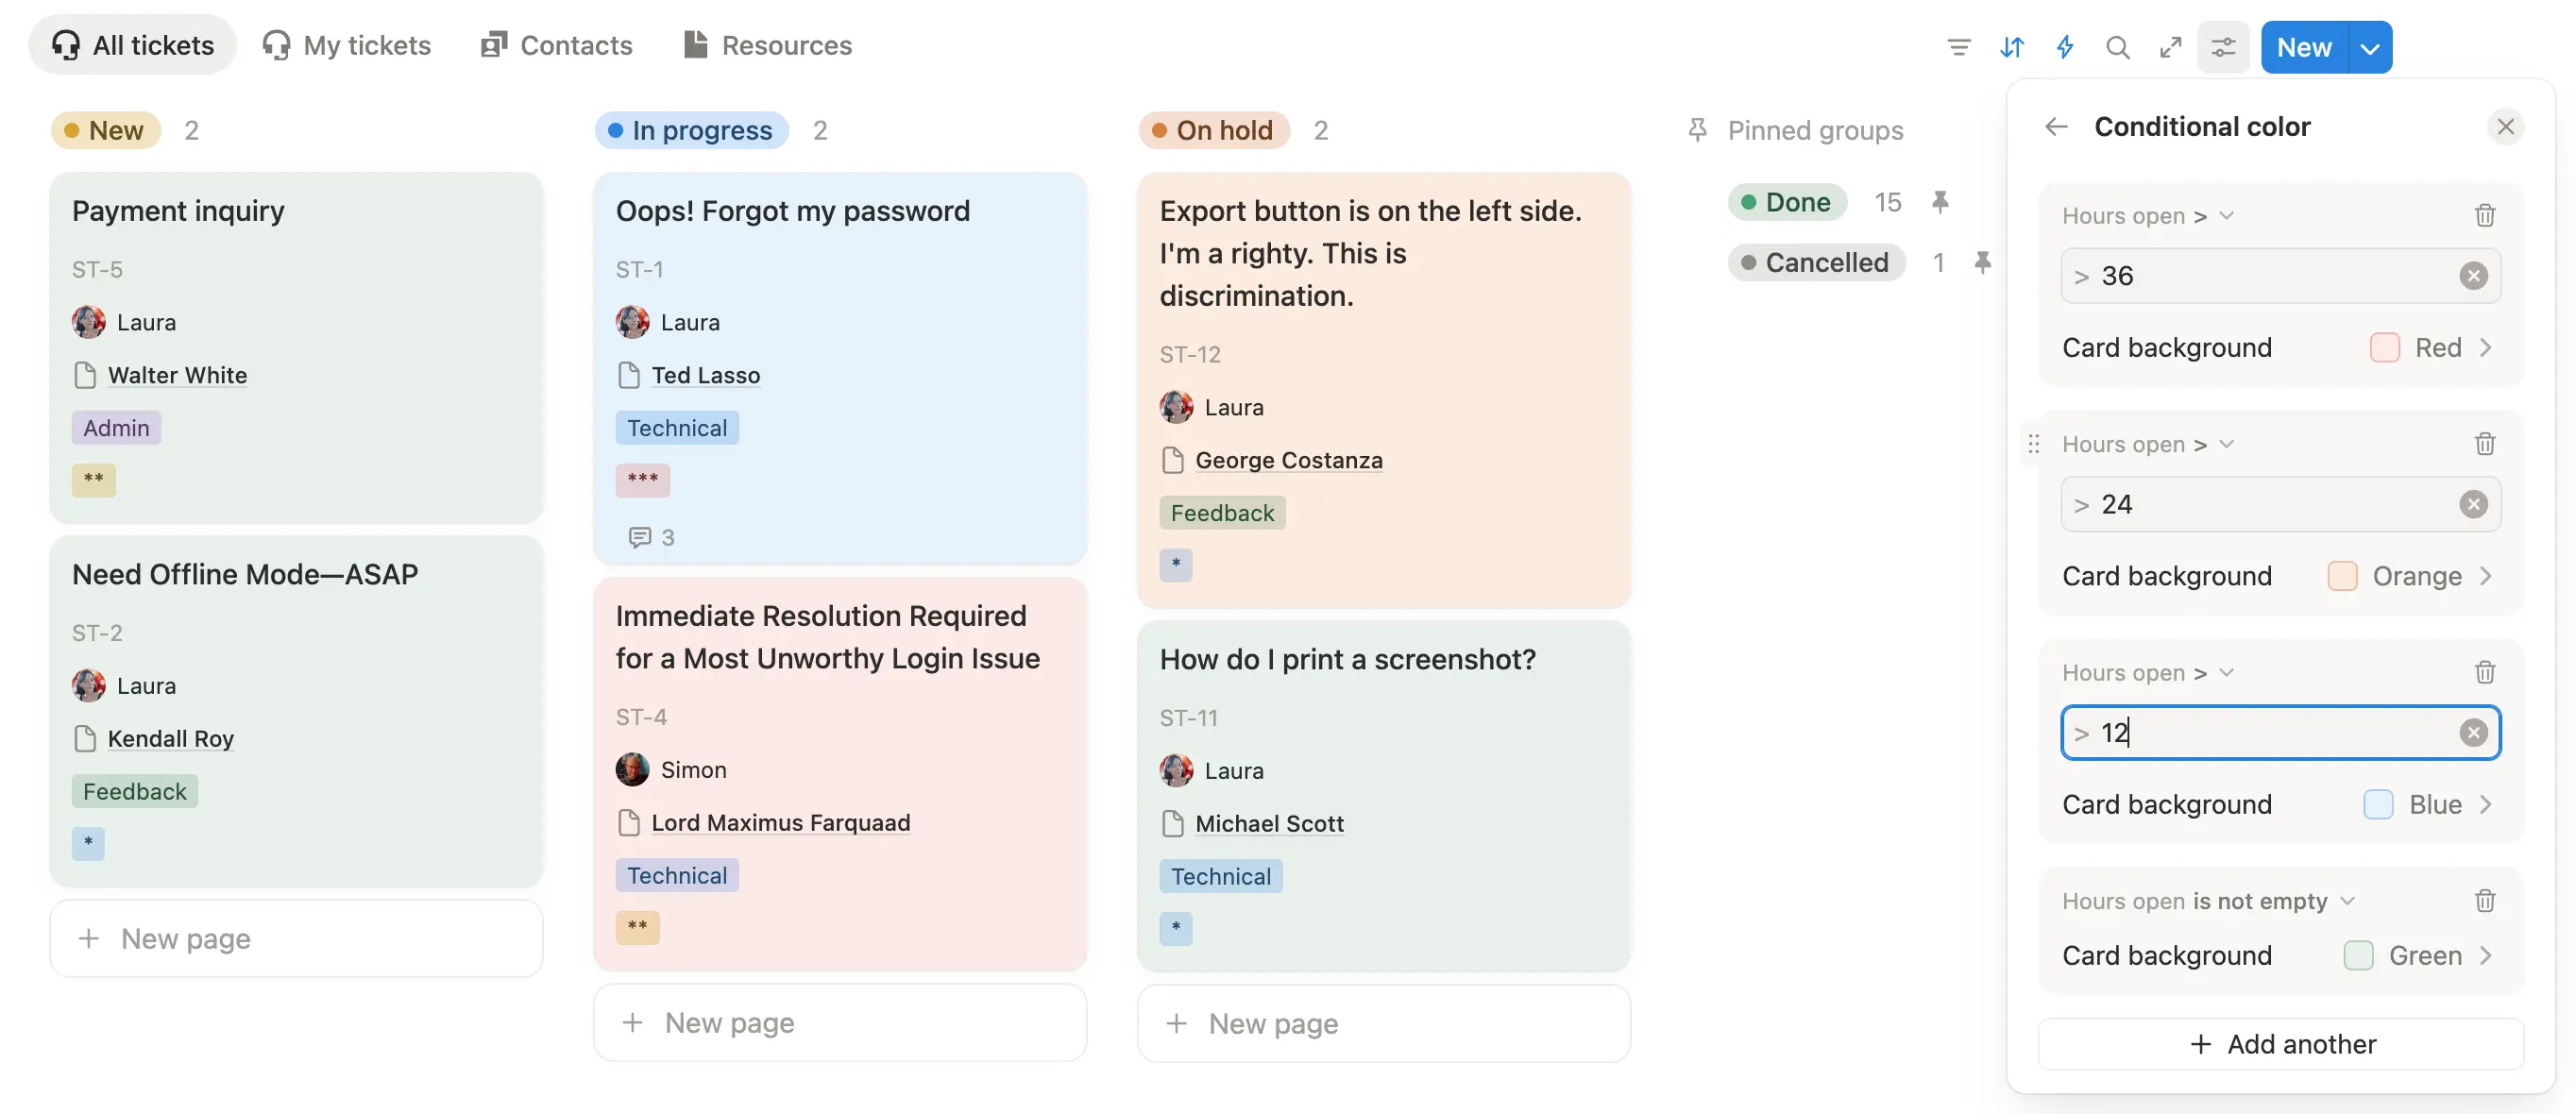
Color formatting
Use color formatting on your board to spot tickets that need attention:
- By age - The longer a ticket has been open, the more red it appears.
- By last activity - Color based on how long since the last email was exchanged (using Last Email Date). Stale conversations stand out.
This makes it easy to see which tickets are slipping through the cracks.
Recommended charts
Use Notion’s chart views to visualize your support data:
- Tickets by assignee - See workload distribution across your team.
- Tickets by tag - Spot which categories generate the most volume (Technical, Billing, Feedback).
- Average time open by priority - Check if high-priority tickets are being resolved faster.
- Volume over time - Track ticket creation and closure trends week over week or month over month.
Our free template includes example charts you can customize.

Notion AI
It wouldn’t be a 2025 guide without mentioning AI.
Since your tickets live in Notion and email threads live in comments, you can use AI to work with them directly. This section covers how to use Notion AI to speed up support - though if you’re technical, connecting your own AI agent via Notion’s MCP server is also an option.
The prompt page approach
The most effective way to use Notion AI with tickets is to create a reusable prompt page. Instead of typing instructions every time, store your prompt in a Notion page and @mention it when you ask AI for help.
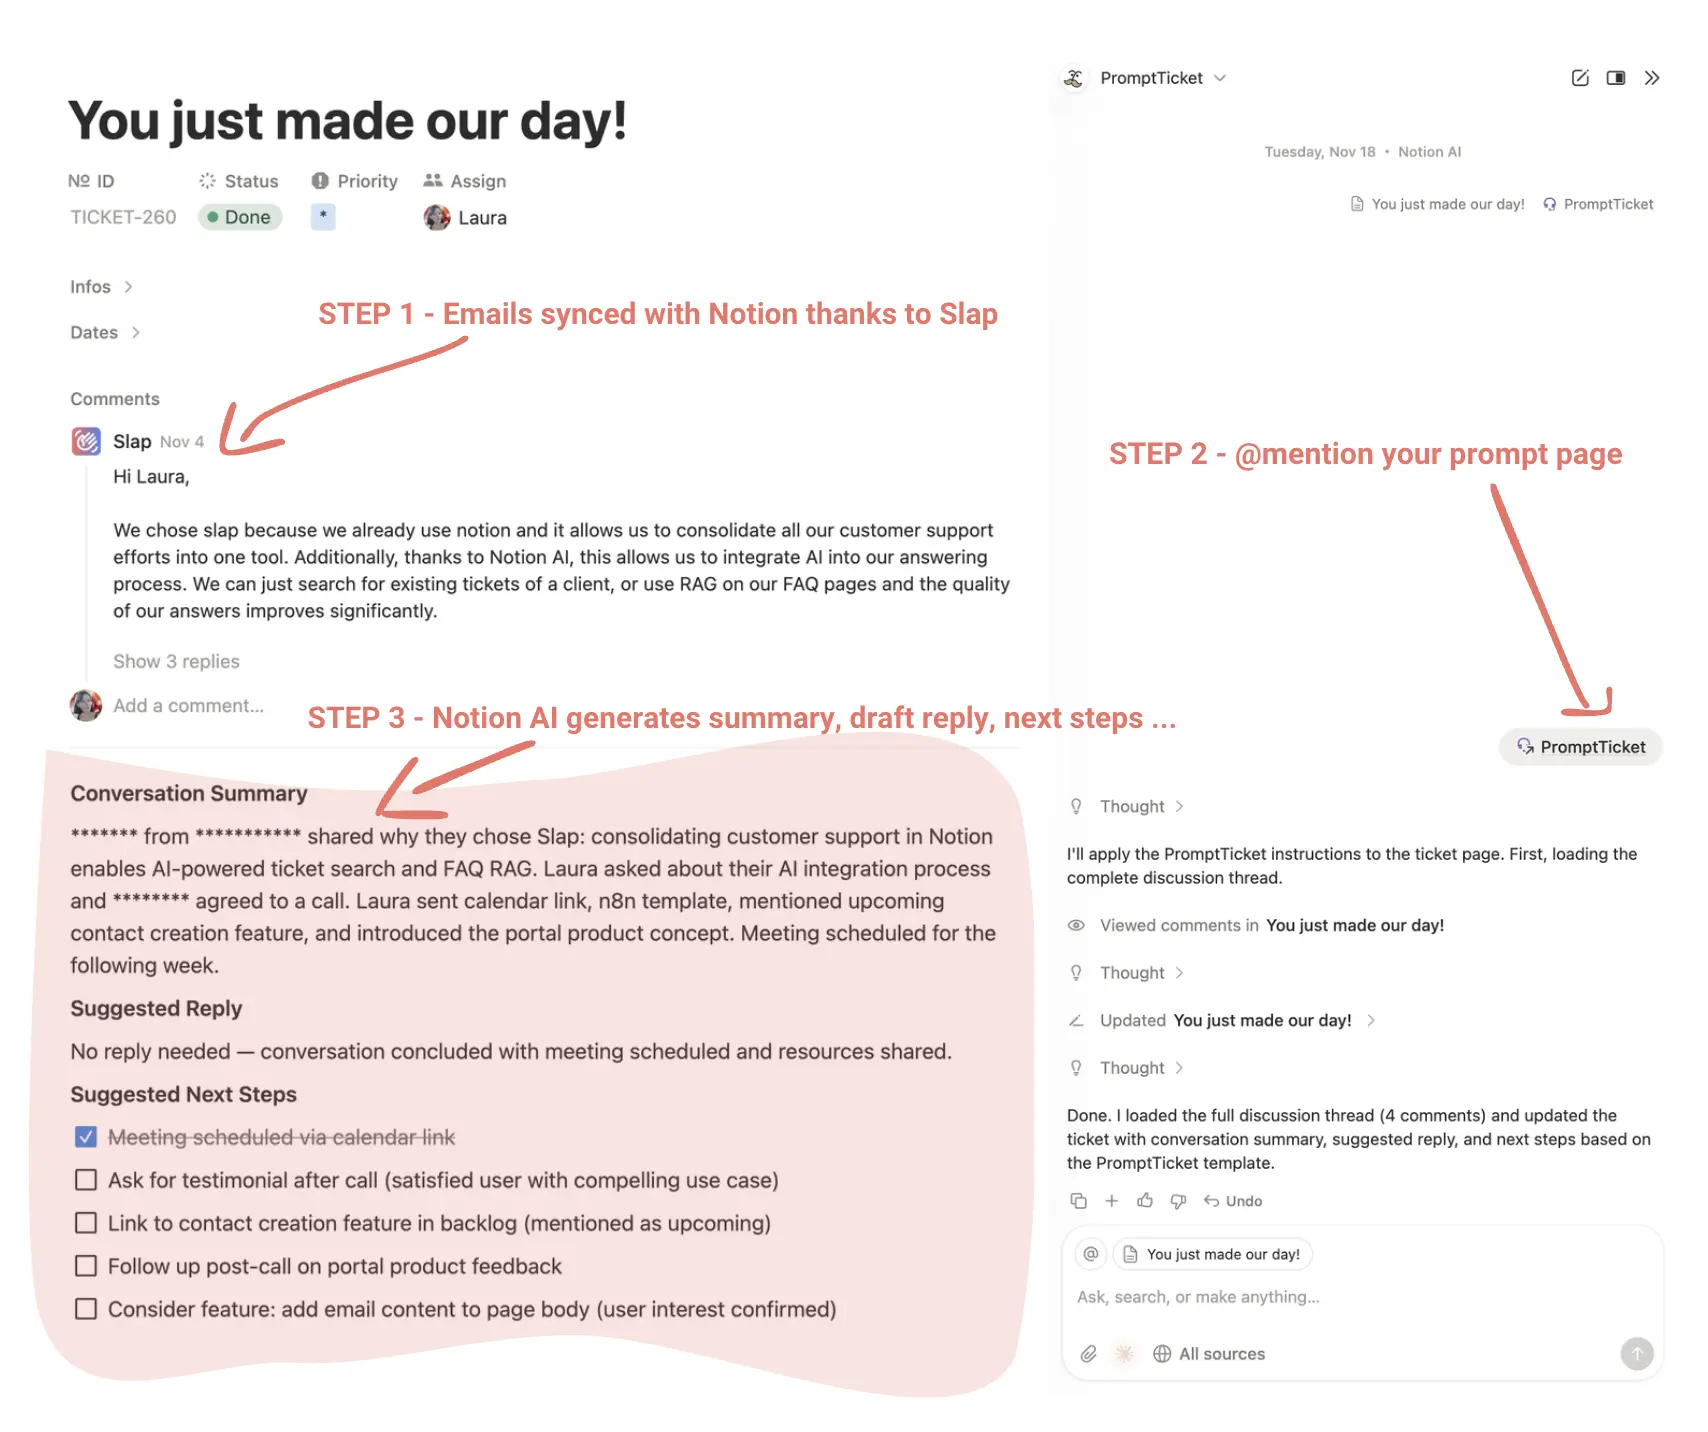
How it works:
- Create a page with your prompt instructions (e.g., “Summarize this email thread in 4 sentences. Draft a reply. Suggest next steps.”)
- Open a ticket page and launch Notion AI (Cmd+J or Ctrl+J)
- @mention your prompt page in the chat
- Notion AI reads your prompt instructions plus the email thread in comments, then generates the output
Why use a prompt page? Beyond consistency, it lets you iterate. Tweak the wording, adjust the output format, add examples of what you want - and test on real tickets until you get exactly the results you need. Your prompt becomes a living document that improves over time.
What you can do
Summarize the conversation - Long threads are hard to scan. Ask AI to give you the key points: what the customer asked, what’s been tried, where things stand. Especially useful when picking up a ticket from a colleague.
Draft a reply - Let AI write the first draft. Even better: if your documentation lives in Notion, @mention it so AI can pull relevant information into the response.
Identify next steps - Ask AI what actions are needed. It might suggest following up on an unanswered question, linking the ticket to a backlog item, or flagging that this customer would be great for a testimonial.
Spot patterns across tickets - Use AI to analyze your database. “What are the most common feature requests?” or “Which issues keep coming up for Pro plan customers?” turns support data into product insights.
Turn a reply into documentation - Wrote a detailed explanation? Ask AI to reformat it as a help article. Add it to your docs so you don’t write the same answer twice.
Get started
You’ve seen how to build a complete ticketing system in Notion: receive tickets from email or forms, reply directly from your database, automate workflows, track metrics, and use AI to work faster.
Ready to try it?
- Grab the template - Get our free Customer Support template with the database structure, views, and example charts already set up.
- Start your SlapMail trial - Sign up here and connect your support mailbox in minutes.
- Send yourself a test email - Watch it appear in Notion and reply from there.
Questions? Check our documentation or reach out at laura@getslap.co .